
How to Identify Dislocated Shoulder Symptoms: Warning Signs & Treatment Options

How to Identify Dislocated Shoulder Symptoms: Warning Signs & Treatment Options Understanding dislocated shoulder symptoms is crucial for early diagnosis and effective treatment. A shoulder dislocation is a painful condition that occurs when the upper arm bone (humerus) pops out of the shoulder socket. Since the shoulder joint is the most mobile joint in the body, it is also highly prone to instability and injury. Recognizing dislocated shoulder symptoms early can help prevent complications such as nerve damage, chronic instability, and repeated dislocations. Whether caused by sports injuries, falls, or accidents, timely care is essential for proper healing. What Is a Dislocated Shoulder? A dislocated shoulder occurs when the ball of the shoulder joint moves out of its socket. This condition is also known as shoulder joint dislocation and can be partial (subluxation) or complete. Types of Shoulder Dislocation: Anterior Dislocation (most common): The bone moves forward Posterior Dislocation: The bone moves backward Inferior Dislocation: Rare, downward displacement A shoulder joint dislocation can damage surrounding ligaments, muscles, and tissues, making it important to identify dislocated shoulder symptoms quickly. Common Dislocated Shoulder Symptoms Recognizing dislocated shoulder symptoms early helps you take quick action, reduce pain, and prevent serious complications like nerve damage, repeated dislocation, and long-term shoulder instability. 1 Severe Shoulder Pain One of the first dislocated shoulder symptoms is intense pain, especially when trying to move the arm. 2 Visible Deformity The shoulder may appear out of place or have an unusual shape compared to the normal side. 3 Swelling and Bruising Inflammation and discoloration develop quickly after a dislocated shoulder. 4 Limited Range of Motion You may find it difficult or impossible to move your arm due to pain and joint instability. 5 Numbness or Tingling Nerve involvement can cause tingling sensations in the arm or hand. 6 Muscle Spasms Involuntary muscle tightening is another common indicator of a dislocated shoulder. Warning Signs You Should Not Ignore Some dislocated shoulder symptoms require immediate medical attention, such as severe pain, visible deformity, swelling, numbness, or inability to move the arm. Ignoring these warning signs can lead to complications like nerve damage, repeated dislocation, and long-term shoulder instability. Red Flags: Inability to move the arm Severe, persistent pain Visible dislocation Loss of sensation Weak pulse in the arm Ignoring these signs can worsen the condition and complicate shoulder dislocation treatment. Causes of Dislocated Shoulder A dislocated shoulder can occur due to sports injuries, falls, accidents, or sudden impact. Weak ligaments and previous injuries can also increase the risk of shoulder joint dislocation and recurring instability. Sports Injuries Contact sports like cricket, football, and wrestling often lead to shoulder joint dislocation. Falls and Accidents Landing on an outstretched arm is a common cause. Sudden Impact Road accidents or heavy blows can force the shoulder out of place. Weak Ligaments Loose or previously injured ligaments increase the risk of repeated dislocations. Diagnosis of Dislocated Shoulder Symptoms Proper diagnosis is essential for effective shoulder dislocation treatment. Accurate assessment using physical exams and imaging helps identify damage, guide reduction, and ensure faster recovery while preventing complications. Physical Examination Doctors evaluate visible deformity, swelling, and movement limitations. Imaging Tests X-rays: Confirm the dislocation MRI: Detect soft tissue damage CT scan: Assess complex injuries Diagnosis helps determine whether immediate shoulder dislocation reduction is needed. Treatment Options for Dislocated Shoulder Treatment depends on the severity of dislocated shoulder symptoms, ranging from rest and immobilization to medical reduction and physiotherapy. In severe cases, surgery may be required to restore stability, reduce pain, and prevent repeated shoulder dislocation in the future. Immediate First Aid Immobilize the arm Apply ice to reduce swelling Avoid moving the shoulder Never attempt self-shoulder dislocation reduction, as it may cause further damage. Shoulder Dislocation Reduction Shoulder dislocation reduction is a medical procedure where the bone is placed back into the socket by a trained professional. This is usually done under sedation to reduce pain. Non-Surgical Treatment After reduction, conservative care includes: Sling immobilization Pain relief medications Physiotherapy This approach is effective for many first-time dislocations. Shoulder Dislocation Exercise Rehabilitation plays a key role in recovery. Proper shoulder dislocation exercise helps restore strength and mobility. Examples: Pendulum swings Wall climbing exercises Resistance band strengthening These exercises are essential for preventing future shoulder joint dislocation. Surgical Treatment Surgery may be required if: There are repeated dislocations Ligaments are severely damaged Conservative treatment fails Surgical procedures aim to stabilize the dislocated shoulder and prevent recurrence. Recovery Timeline Recovery varies depending on severity. Typical Recovery Phases: 0–2 weeks: Pain control and immobilization 3–6 weeks: Gradual movement 6–12 weeks: Strengthening with shoulder dislocation exercise 3–6 months: Full recovery Following rehabilitation guidelines ensures proper healing of the dislocated shoulder. Complications of Untreated Dislocated Shoulder Recovery from a dislocated shoulder varies by severity, but most cases improve with rest, physiotherapy, and gradual exercises. Proper care helps restore strength, mobility, and reduces the risk of future dislocations. Chronic shoulder instability Repeated dislocations Nerve or blood vessel damage Reduced shoulder strength Timely shoulder dislocation treatment can prevent long-term issues. Prevention Tips Preventing dislocated shoulder symptoms is possible with proper care. Tips: Strengthen shoulder muscles Avoid risky movements Use protective gear during sports Perform regular shoulder dislocation exercise Maintain proper posture Prevention reduces the chances of future shoulder joint dislocation. When to See a Doctor Seek immediate medical help if: You suspect a dislocated shoulder Pain is severe Arm movement is restricted There is numbness or swelling Early intervention improves recovery outcomes. FAQs What are the first dislocated shoulder symptoms? Severe pain, swelling, and inability to move the arm are the earliest signs. Can a dislocated shoulder heal without treatment? No, proper shoulder dislocation treatment is necessary to reposition the joint and avoid complications. How painful is a shoulder dislocation? It is extremely painful and often requires immediate medical attention. What is shoulder dislocation reduction? It is a procedure to put the bone back into its socket safely. How long does recovery take? Recovery usually takes 6 weeks to 3
What Is the Rotator Cuff Interval? Causes of Injury, Symptoms & Treatment Options
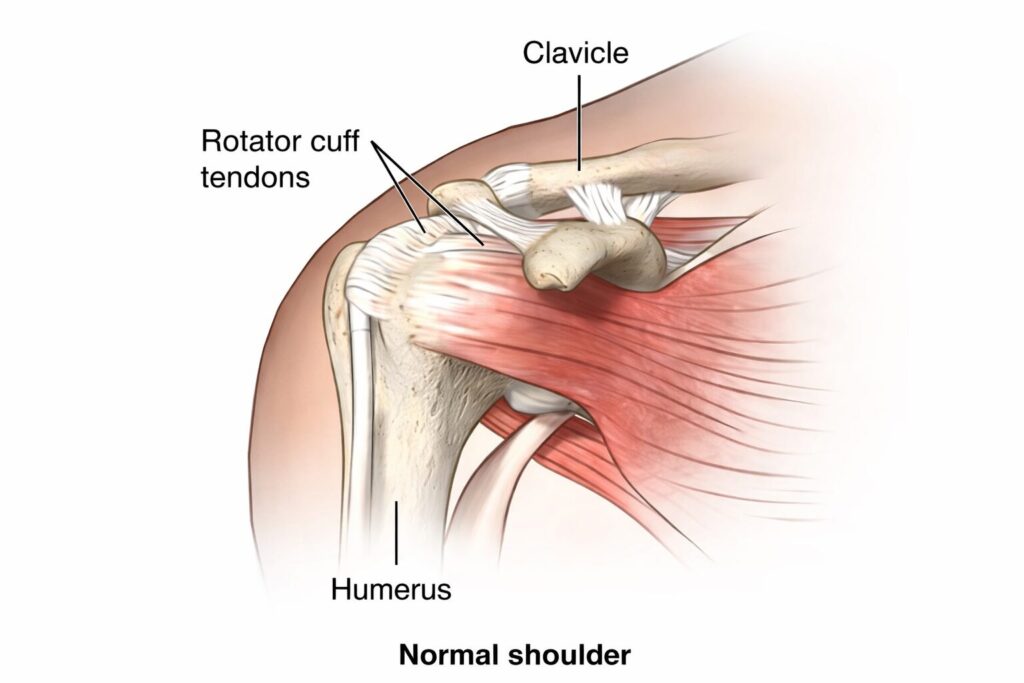
What Is the Rotator Cuff Interval? Causes of Injury, Symptoms & Treatment Options The rotator cuff interval is a small but highly significant anatomical space in the shoulder joint that plays a crucial role in stability and movement. Although often overlooked, this region is essential for maintaining proper shoulder mechanics and preventing instability. Located between two important rotator cuff muscles, the supraspinatus and subscapularis, the rotator cuff interval contains key structures such as ligaments and the long head of the biceps tendon. Any damage or abnormality in this area can lead to shoulder pain, weakness, and restricted movement. Understanding the rotator cuff interval is especially important for patients dealing with chronic shoulder pain or athletes who frequently perform overhead movements. What Is the Rotator Cuff Interval? The rotator cuff interval is a triangular anatomical space in the shoulder. It is bordered by: Supraspinatus tendon (upper side) Subscapularis tendon (lower side) Base formed by the coracoid process This region contains important structures such as: Coracohumeral ligament Superior glenohumeral ligament Long head of the biceps tendon The rotator cuff interval plays a key role in: Stabilizing the shoulder joint Limiting excessive external rotation Preventing upward displacement of the humeral head Any dysfunction in the rotator cuff interval can contribute to shoulder instability and pain, often mimicking a rotator cuff injury. Anatomy and Function of Rotator Cuff Interval The rotator cuff interval acts as a stabilizing bridge between different components of the rotator cuff. While the rotator cuff muscles are responsible for movement and dynamic stability, the interval provides static stability. Key Functions: Maintains joint integrity Supports the biceps tendon Controls shoulder motion Prevents excessive translation of the humeral head Damage to this area can disrupt coordination among the rotator cuff muscles, leading to reduced shoulder efficiency and pain during daily activities. Causes of Rotator Cuff Interval Injury Injury to the rotator cuff interval can occur due to various reasons. These causes are often linked to repetitive stress, trauma, or degeneration. 1 Repetitive Overhead Activities Athletes such as cricketers, swimmers, and tennis players frequently stress the shoulder joint. Over time, this can lead to strain in the rotator cuff interval and surrounding rotator cuff muscles. 2 Trauma or Sudden Injury A fall on the shoulder or lifting a heavy weight incorrectly can damage the rotator cuff interval, sometimes along with a rotator cuff tear. 3 Shoulder Instability Loose ligaments or repeated dislocations can weaken the rotator cuff interval, affecting joint stability. 4 Degenerative Changes Age-related wear and tear can affect the rotator cuff, increasing the risk of interval injuries. 5 Poor Posture Incorrect posture puts uneven stress on the shoulder, contributing to a rotator cuff injury involving the interval. Symptoms of Rotator Cuff Interval Injury Recognizing the symptoms early can help prevent worsening of the condition. A damaged rotator cuff interval often presents symptoms similar to other shoulder problems. Common Symptoms: Persistent shoulder pain Weakness in the arm Limited range of motion Pain during overhead activities Clicking or popping sensation Difficulty lifting objects In severe cases, symptoms may resemble a rotator cuff tear, making proper diagnosis essential. Diagnosis of Rotator Cuff Interval Problems Accurate diagnosis of the rotator cuff interval condition is critical for effective treatment. Physical Examination Doctors assess shoulder movement, strength, and stability to identify signs of rotator cuff injury. Imaging Tests MRI Scan: Best method to visualize soft tissues Ultrasound: Helps detect tears and inflammation X-rays: Rule out bone abnormalities MRI is particularly useful in identifying abnormalities in the rotator cuff interval and differentiating them from a rotator cuff tear. Treatment Options for Rotator Cuff Interval Injury Treatment for rotator cuff interval injuries depends on severity, age, and activity level of the patient. Non-Surgical Treatment Most cases can be managed without surgery. Rest and Activity Modification Avoid activities that strain the rotator cuff interval and allow healing. Medications Anti-inflammatory drugs help reduce pain and swelling. Physiotherapy Targeted rehab strengthens the rotator cuff muscles and improves mobility Rotator Cuff Exercises Proper rehabilitation includes rotator cuff exercises that restore strength and flexibility. Examples: Pendulum exercises External rotation exercises Shoulder blade squeezes These rotator cuff strengthening exercises help stabilize the shoulder and protect the rotator cuff interval. Advanced Non-Surgical Treatments Steroid injections for inflammation PRP therapy for healing These methods are useful in managing chronic rotator cuff injury cases. Surgical Treatment Surgery is recommended when conservative treatment fails or when there is a severe rotator cuff tear involving the interval. Types of Surgery: Arthroscopic repair Interval closure procedures Ligament reconstruction Surgery aims to restore stability and function of the rotator cuff interval. Recovery After Rotator Cuff Interval Treatment Recovery depends on the type of treatment. Non-Surgical Recovery: 4–8 weeks for mild injuries Gradual return to activities Post-Surgery Recovery: 3–6 months for full recovery Physiotherapy is essential Following prescribed rotator cuff strengthening exercises is crucial for long-term success. Who Is at Risk of Rotator Cuff Interval Injury? Certain individuals are more prone to rotator cuff interval issues: Athletes involved in overhead sports People with previous shoulder injuries Older adults with degenerative changes Individuals with poor posture or weak rotator cuff muscles Understanding risk factors helps in early prevention. Prevention Tips for Rotator Cuff Interval Injury Preventing injury to the rotator cuff interval is possible with simple lifestyle changes. Effective Tips: Perform regular rotator cuff exercises Maintain proper posture Avoid overuse of shoulder Warm up before physical activity Strengthen shoulder muscles with rotator cuff strengthening exercises Consistency in these habits reduces the risk of rotator cuff injury. Rotator Cuff Interval vs Rotator Cuff Tear Many people confuse rotator cuff interval problems with a rotator cuff tear. Key Differences: Feature Rotator Cuff Interval Issue Rotator Cuff Tear Location Between tendons Tendon damage Cause Instability, ligament issues Tendon rupture Treatment Rehab, sometimes surgery Often surgical Both conditions may occur together in severe cases. When to See a Doctor You should consult a specialist if: Pain persists for more than 2 weeks Shoulder weakness increases Movement becomes restricted Symptoms worsen despite rest Early treatment
Shoulder Joint Ligaments Explained: Structure, Function, and Common Injuries
Shoulder Joint Ligaments Explained: Structure, Function, and Common Injuries The shoulder is one of the most flexible joints in the human body, allowing a wide range of movements such as lifting, rotating, and reaching. However, this high mobility also makes the shoulder more vulnerable to injuries. One of the most important components that provide stability to the shoulder joint is the shoulder joint ligaments. These ligaments connect bones and help maintain proper joint alignment. Understanding shoulder joint ligaments is important because damage to these structures can lead to pain, instability, and restricted movement. Many people experience shoulder injuries during sports, accidents, or repetitive physical activities. In such cases, problems like shoulder ligament strain, shoulder ligament tear, or torn shoulder ligament can occur. In this detailed guide, we will explain the structure, function, and common injuries related to shoulder joint ligaments, along with symptoms, causes, and treatment options. Understanding Shoulder Joint Ligaments The shoulder joint ligaments are strong bands of connective tissue that connect bones within the shoulder joint. These ligaments help hold the shoulder together and prevent excessive movement that may cause injury. The shoulder joint mainly consists of the humerus (upper arm bone), scapula (shoulder blade), and clavicle (collarbone). The shoulder joint ligaments provide stability to this complex structure and allow smooth joint movement while protecting the joint from dislocation or damage. When these ligaments are overstretched or torn, it may lead to shoulder ligament damage and severe discomfort. Structure of Shoulder Joint Ligaments The shoulder joint ligaments include several important ligament structures that stabilize the shoulder joint. 1. Glenohumeral Ligaments These ligaments are the primary stabilizers of the shoulder joint. They connect the humerus to the glenoid cavity of the scapula and help prevent excessive movement. Injuries to these ligaments may result in shoulder ligament injury and instability in the shoulder joint. 2. Coracohumeral Ligament This ligament supports the upper part of the shoulder joint and helps prevent downward displacement of the humerus. Damage to this ligament can cause shoulder ligament pain and difficulty lifting the arm. 3. Coracoacromial Ligament This ligament forms a protective arch over the shoulder joint. It prevents the humeral head from moving upward excessively. When injured, it may lead to shoulder ligament strain and inflammation. 4. Acromioclavicular Ligament This ligament connects the clavicle to the acromion of the scapula. It stabilizes the acromioclavicular joint and supports shoulder movement. An injury to this ligament may cause shoulder injuries such as AC joint separation. Function of Shoulder Joint Ligaments The shoulder joint ligaments play several important roles in maintaining shoulder stability and mobility. Joint Stability One of the primary functions of shoulder joint ligaments is to stabilize the shoulder joint. They prevent excessive or abnormal movement that could lead to injury. Supporting Movement The shoulder allows complex movements such as rotation, lifting, and extension. Shoulder joint ligaments help control these movements and keep the bones aligned. Injury Prevention Strong shoulder joint ligaments protect the shoulder joint from dislocation and other shoulder injuries during physical activity. Common Shoulder Ligament Injuries Damage to the shoulder joint ligaments can occur due to sports activities, trauma, or repetitive strain. Some of the most common ligament injuries include the following: Shoulder Ligament Strain A shoulder ligament strain occurs when the ligament is overstretched but not completely torn. This condition often develops during heavy lifting or sudden shoulder movement. Shoulder Ligament Tear A shoulder ligament tear occurs when the ligament fibers partially or completely rupture. This injury may cause severe pain, swelling, and restricted movement. In severe cases, a torn shoulder ligament may require medical treatment or surgery. Shoulder Ligament Damage Repeated stress on the shoulder can cause gradual shoulder ligament damage. Athletes who play sports such as cricket, tennis, or swimming are more likely to experience this problem. Shoulder Dislocation Shoulder dislocation can also damage shoulder joint ligaments, leading to instability and recurrent shoulder injuries. Shoulder Injury Symptoms Recognizing shoulder injury symptoms early can help prevent serious complications. Some common symptoms include: Persistent shoulder ligament pain Swelling around the shoulder joint Difficulty lifting or rotating the arm Shoulder instability Limited range of motion Clicking or popping sounds in the shoulder If these shoulder injury symptoms continue for several days, it is important to consult a medical professional for proper diagnosis. Causes of Shoulder Ligament Injuries Several factors can contribute to injuries involving shoulder joint ligaments. Sports Activities Athletes involved in throwing sports such as baseball or cricket often experience shoulder ligament injury due to repetitive overhead movements. Trauma or Accidents Falls, accidents, or direct impact on the shoulder can cause shoulder ligament tear or other serious shoulder injuries. Overuse Repetitive stress from activities like weightlifting can lead to shoulder ligament strain. Weak Muscles Weak shoulder muscles increase the risk of shoulder ligament damage because the ligaments have to compensate for reduced muscle support. Shoulder Ligament Tear Treatment The treatment for ligament injuries depends on the severity of the damage. Proper shoulder ligament tear treatment may include several approaches. Rest and Activity Modification Resting the shoulder allows the injured ligament to heal naturally. Avoiding activities that cause pain is important during recovery. Ice Therapy Applying ice to the shoulder can reduce swelling and relieve shoulder ligament pain. Physiotherapy Physiotherapy exercises help strengthen the shoulder muscles and improve joint stability after shoulder ligament injury. Medications Doctors may prescribe anti-inflammatory medications to manage pain and swelling. Surgery In severe cases involving a torn shoulder ligament, surgery may be required to repair the damaged ligament. Early shoulder ligament tear treatment helps restore shoulder function and prevent long-term complications. Preventing Shoulder Ligament Injuries Preventing damage to shoulder joint ligaments is possible by following a few simple precautions. Perform a proper warm-up before sports activities Strengthen shoulder muscles through regular exercise Avoid sudden heavy lifting Maintain correct posture during workouts Follow proper training techniques These measures can reduce the risk of shoulder injuries and protect the ligaments from strain or damage. When to See a Doctor You should seek medical attention if you experience: Severe
Slip Disc Problem: Causes, Symptoms, Diagnosis & Treatment Options
Slip Disc Problem: Causes, Symptoms, Diagnosis & Treatment Options Back pain is one of the most common health issues affecting people today. Among the various spinal conditions that lead to persistent discomfort, the slip disc problem is one of the most frequently diagnosed conditions. It occurs when the soft inner portion of a spinal disc pushes through its outer layer and irritates nearby nerves. The human spine is made up of vertebrae separated by discs that act as shock absorbers. These discs allow smooth movement of the spine while protecting it from pressure and sudden impact. However, when discs become damaged due to injury or poor posture, a spinal disc injury may occur, sometimes requiring Dislocation & Subluxation Management for proper treatment. This guide explains the causes, symptoms, diagnosis, and treatment options for the slip disc problem, along with helpful exercises and preventive strategies. What Is a Slip Disc Problem? Understanding Spinal Disc Anatomy The slip disc problem, medically referred to as a herniated or prolapsed disc, occurs when the soft gel-like material inside a spinal disc pushes outward through a tear in its outer layer. Each spinal disc has two main components: Annulus fibrosus – the tough outer ring that holds the disc together Nucleus pulposus – the soft inner gel that absorbs pressure When the outer layer weakens or tears, the inner gel can bulge outward and press on nearby nerves, causing pain and other neurological symptoms. Common Areas Affected A spinal disc injury can occur in different parts of the spine, but it most commonly affects: Lumbar spine (lower back) Cervical spine (neck region) Thoracic spine (upper back, less common) The lower back is particularly vulnerable because it carries most of the body’s weight and experiences significant movement and stress during daily activities. Understanding the nature of a slip disc problem helps patients recognize the importance of early diagnosis and treatment. Causes of Slip Disc Problem Age-Related Degeneration Injuries such as ACL or MCL tears can cause instability and pain in the knee joint. 2. Arthritis One of the most common causes of a slip disc problem is natural wear and tear of the spinal discs. As people age, discs gradually lose their flexibility and water content, making them more prone to damage. Improper Lifting Techniques Incorrect lifting techniques place excessive pressure on the spine. Common mistakes include: lifting heavy objects without bending the knees twisting the back while lifting sudden jerking movements These actions increase the risk of a spinal disc injury. Poor Posture Sitting for long hours with improper posture can weaken spinal muscles and increase pressure on spinal discs. Common posture-related risks include: slouching while sitting working long hours on a computer lack of ergonomic support Sports Injuries and Trauma Athletes involved in high-impact sports may develop a slip disc problem due to sudden twisting movements or accidents. Obesity and Lifestyle Factors Excess body weight increases stress on the spine and contributes to disc degeneration. Risk factors include: sedentary lifestyle lack of regular exercise weak core muscles Identifying these causes can help individuals adopt preventive measures and reduce the risk of future spinal disc injury. Slipped Disc Symptoms Common Symptoms of a Slip Disc The symptoms of a slip disc problem depend on the location of the injured disc and the nerves affected. Common slipped disc symptoms include: persistent lower back pain pain radiating to the legs or arms numbness or tingling sensations muscle weakness stiffness in the back Sciatica and Nerve Pain When a disc presses on the sciatic nerve, patients may experience sciatica, which causes: sharp pain from the lower back to the leg burning sensation in the leg difficulty standing or walking Severe Symptoms That Need Immediate Attention In rare cases, severe nerve compression may cause: loss of bladder or bowel control severe muscle weakness inability to move normally These symptoms require immediate medical evaluation and prompt slip disc treatment. Diagnosis of Slip Disc Problem Physical Examination Doctors begin diagnosing a slip disc problem by conducting a detailed physical examination. During the examination, doctors check: spinal alignment muscle strength reflex responses nerve sensitivity These tests help identify signs of a spinal disc injury. Imaging Tests Imaging tests are essential to confirm the diagnosis and determine the severity of the condition. Common diagnostic tools include: MRI Scan MRI is the most reliable test for detecting disc damage and nerve compression. X-Ray X-rays help identify bone abnormalities or spinal alignment issues. CT Scan CT scans provide detailed images of the spine for complex cases. Accurate diagnosis helps doctors determine the most effective slip disc problem solution for each patient. Slip Disc Treatment Options Non-Surgical Treatments Most patients recover from a slip disc problem without surgery. Common slip disc treatment methods include: pain-relief medications anti-inflammatory drugs physiotherapy and rehabilitation Physiotherapy strengthens spinal muscles and improves flexibility, reducing pressure on the injured disc. Supportive Devices Doctors may recommend supportive devices such as a slip disc belt to stabilize the lower back and reduce strain during movement. Benefits of using a slip disc belt include: improved posture support reduced spinal pressure temporary pain relief during daily activities Surgical Treatment Surgery is considered when: severe nerve compression occurs conservative treatment fails mobility is severely affected Modern minimally invasive procedures allow doctors to treat a spinal disc injury with faster recovery and minimal complications. Slipped Disc Exercises and Prevention Exercises for Recovery Regular slipped disc exercises can strengthen the spine and help relieve pain. Common recommended exercises include: pelvic tilt exercises knee-to-chest stretches gentle back extensions core strengthening exercises Hamstring flexibility plays an important role in spinal health. Tight hamstrings can increase pressure on the lower back and worsen a slip disc problem. Learning proper hamstring injury prevention exercises can help reduce spinal strain and support recovery. Lifestyle Changes for Prevention Preventing a slip disc problem requires maintaining a healthy lifestyle. Important preventive measures include: maintaining correct posture avoiding heavy lifting staying physically active strengthening core muscles Many patients ask How to solve slip
Knee Cap for Pain Relief: Benefits, Types, and How It Supports Knee Recovery
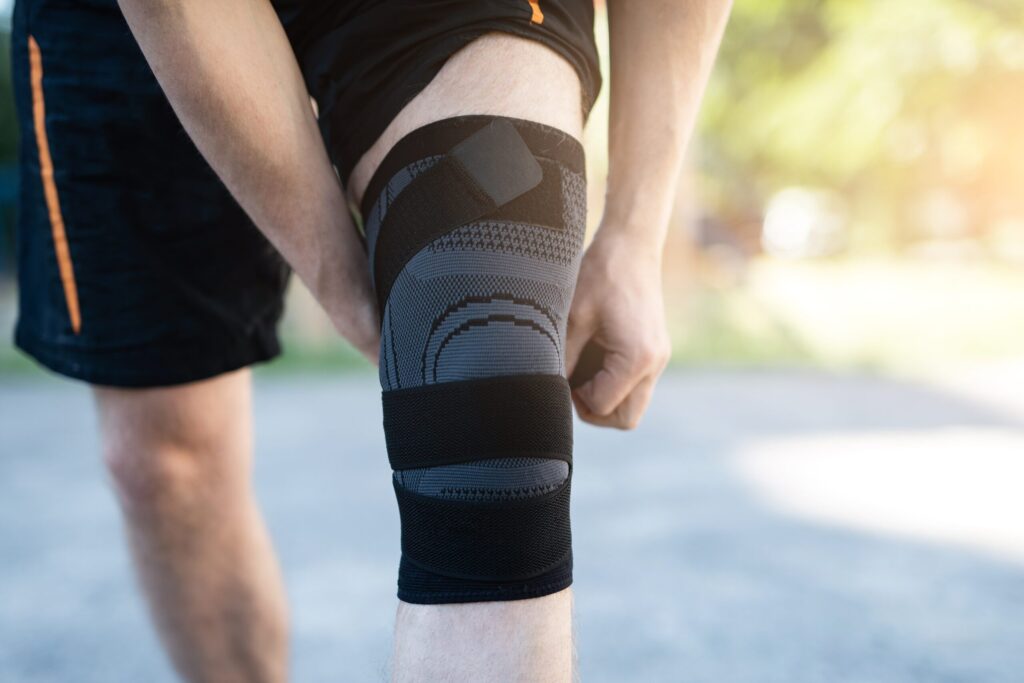
Knee Cap for Pain Relief: Benefits, Types, and How It Supports Knee Recovery Knee pain is a common problem that affects people of all ages. Whether it is caused by injury, arthritis, overuse, or muscle weakness, knee pain can significantly affect daily activities such as walking, climbing stairs, and exercising. One of the most commonly recommended support tools for managing knee discomfort is a knee cap for pain relief. A knee cap for pain relief helps stabilise the knee joint, reduce pressure on the muscles and ligaments, and provide compression that can decrease swelling and discomfort. Many doctors and physiotherapists recommend using a knee cap along with proper knee pain treatment, exercises, and lifestyle modifications for better recovery. In this blog, we will explore how a knee cap for pain relief works, its benefits, different types available, and how it supports long-term knee recovery. What Is a Knee Cap for Pain Relief? A knee cap for pain relief is a supportive orthopaedic brace designed to provide compression, stability, and protection to the knee joint. It is commonly made of elastic, neoprene, or fabric materials that fit snugly around the knee. People suffering from knee joint pain, sports injuries, ligament strain, arthritis, or muscle weakness often use a knee cap for pain relief to reduce stress on the knee and improve mobility. Doctors often include a knee cap for pain relief as part of a comprehensive knee pain treatment plan because it helps protect the joint during daily movement and physical activity. Common Knee Pain Causes Understanding the knee pain causes can help determine when a knee cap for pain relief may be beneficial. Knee pain can develop due to several reasons, including: 1. Ligament Injuries Injuries such as ACL or MCL tears can cause instability and pain in the knee joint. 2. Arthritis Osteoarthritis is one of the most common knee pain causes, especially in older adults. It occurs when the cartilage in the knee joint gradually wears down. 3. Meniscus Tear The meniscus is a cartilage that cushions the knee joint. A tear can cause severe knee joint pain and swelling. 4. Overuse or Sports Injuries Athletes and physically active individuals often experience knee pain due to repetitive stress on the joint. 5. Muscle Weakness Weak muscles around the knee can increase stress on the joint, leading to chronic discomfort. Using a knee cap for pain relief in such conditions can help stabilize the joint and reduce pressure on injured tissues. Benefits of Using a Knee Cap for Pain Relief A knee cap for pain relief provides several advantages for people suffering from knee discomfort. Here are some of the key benefits: 1. Provides Joint Stability One of the main benefits of a knee cap for pain relief is that it stabilises the knee joint. It helps prevent abnormal movements that may worsen injuries. 2. Reduces Swelling and Inflammation Compression from a knee cap for pain relief improves blood circulation around the knee and helps reduce swelling. 3. Supports Knee Recovery During rehabilitation, wearing a knee cap for pain relief can support healing tissues and protect the knee from further damage. 4. Improves Mobility People suffering from knee joint pain often find it difficult to walk or perform physical activities. A knee cap for pain relief can make movement easier and more comfortable. 5. Prevents Further Injury For athletes or individuals recovering from injury, a knee cap for pain relief provides extra support that reduces the risk of further knee damage. Types of Knee Cap for Pain Relief There are different types of knee cap for pain relief available depending on the severity of knee pain and the level of support needed. 1. Compression Knee Cap This type of knee cap for pain relief provides gentle compression to improve circulation and reduce swelling. It is commonly used for mild knee joint pain. 2. Patellar Support Knee Cap This knee brace has a special opening around the kneecap to support the patella and reduce pressure. 3. Hinged Knee Cap A hinged knee cap for pain relief provides strong support and is often recommended after ligament injuries or surgery. 4. Elastic Knee Cap Elastic knee caps are lightweight and flexible. They are ideal for daily use and mild knee pain treatment. Choosing the right knee cap for pain relief depends on the cause and severity of the knee problem. How a Knee Cap Supports Knee Recovery A knee cap for pain relief plays an important role in the recovery process by supporting the knee joint and surrounding muscles. 1. Reduces Pressure on the Knee Joint By providing compression and support, a knee cap for pain relief reduces the load on the knee joint. 2. Improves Blood Circulation Better circulation helps deliver oxygen and nutrients to injured tissues, promoting faster healing. 3. Helps Maintain Proper Alignment Proper knee alignment reduces strain on ligaments and cartilage, which is essential for recovery. 4. Encourages Safe Movement When people experience knee joint pain, they often avoid movement. A knee cap for pain relief gives confidence and support for safe movement. Knee Pain Exercises for Knee Pain Along with using a knee cap for pain relief, performing proper knee pain exercises for knee pain can strengthen the muscles around the knee and reduce pain. 1. Straight Leg Raises This exercise strengthens the quadriceps muscles without putting pressure on the knee joint. 2. Hamstring Stretch Stretching the hamstring muscles improves flexibility and reduces knee strain. 3. Heel Slides Heel slides help improve knee mobility and reduce stiffness. 4. Quadriceps Strengthening Strong quadriceps muscles provide better support to the knee joint and help in knee pain treatment. Regular knee pain exercises for knee pain combined with a knee cap for pain relief can significantly improve knee stability and recovery. When Should You Use a Knee Cap for Pain Relief? A knee cap for pain relief is commonly recommended in the following situations: Mild to moderate knee joint pain Sports injuries Ligament strain or instability Arthritis-related knee
Knee Ligament Tear Symptoms: Early Signs, Causes & Treatment Options
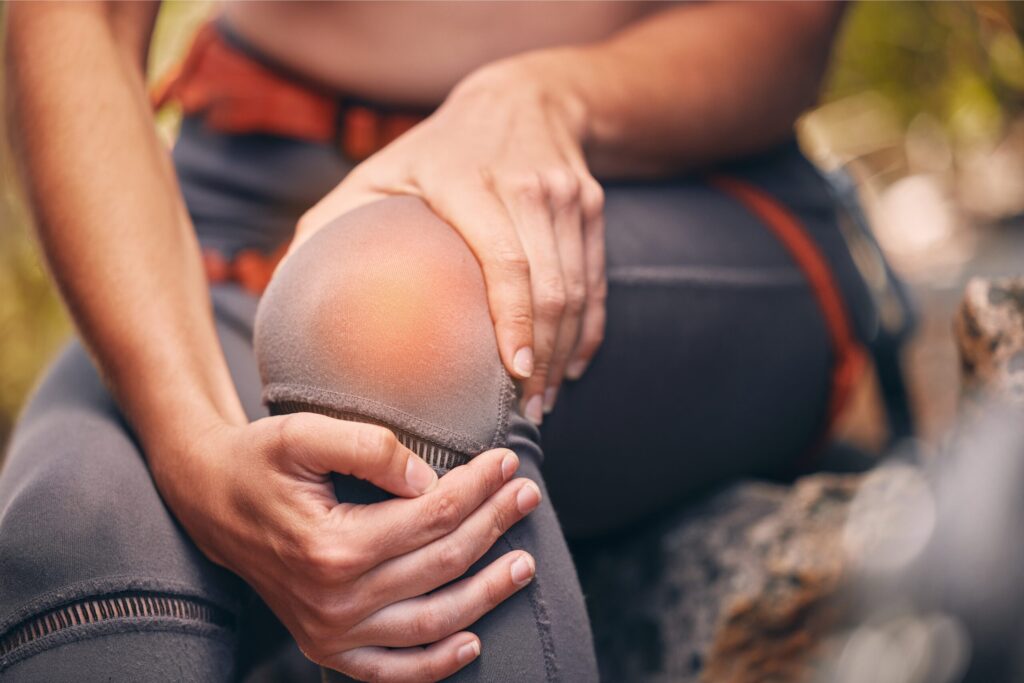
Knee Ligament Tear Symptoms: Early Signs, Causes & Treatment Options The knee joint plays a crucial role in everyday movement, such as walking, running, climbing stairs, and participating in sports. Because of its complex structure and constant use, the knee is vulnerable to injuries. One of the most common and serious injuries affecting the knee is a knee ligament tear. Recognising knee ligament tear symptoms early is extremely important because untreated ligament injuries can lead to long-term knee instability, chronic pain, and difficulty performing daily activities. The knee contains several strong tissues called knee ligaments that connect bones together and keep the knee joint stable. When these ligaments become overstretched or torn, it results in a knee ligament injury that may require medical treatment, physiotherapy, or even knee ligament surgery in severe cases. In this comprehensive guide, we will explore the knee ligament tear symptoms, causes, diagnosis, and the best knee ligament injury treatment options available. Understanding Knee Ligaments and Their Function Before learning about knee ligament tear symptoms, it is important to understand how the knee works. The knee is supported by several knee joint ligaments that stabilise the joint and allow smooth movement. These ligaments hold the bones together and prevent excessive movement that could damage the joint. The four main ligaments of the knee include: Anterior Cruciate Ligament (ACL) The ACL is one of the most important knee ligaments. It controls the forward movement of the shin bone and prevents the knee from rotating excessively. Posterior Cruciate Ligament (PCL) The PCL stabilizes the knee by preventing the shin bone from moving backward. Medial Collateral Ligament (MCL) The MCL supports the inner side of the knee and protects it from inward bending forces. Lateral Collateral Ligament (LCL) The LCL supports the outer side of the knee and helps maintain stability during movement. In addition to these major ligaments, the coronary ligament knee structures help anchor the meniscus and maintain joint stability. When any of these structures become damaged, it leads to a knee ligament injury that may affect mobility and joint function. Knee Ligament Tear Symptoms Identifying knee ligament tear symptoms early can help prevent complications and ensure timely treatment. The symptoms may vary depending on which ligament is injured and how severe the damage is. Sudden Knee Pain One of the earliest knee ligament tear symptoms is sudden and intense pain in the knee joint. The pain usually occurs immediately after the injury and may worsen when attempting to move or place weight on the knee. Swelling Around the Knee Swelling is another common sign of a knee ligament injury. The knee may swell within a few hours due to inflammation or internal bleeding within the joint. Swelling often causes tightness and discomfort around the knee. Knee Instability A feeling of instability is one of the most noticeable knee ligament tear symptoms. Many patients describe the sensation that the knee might “give out” while walking or standing. This occurs because damaged knee joint ligaments are no longer able to stabilize the joint properly. Difficulty Walking A knee ligament tear can make walking painful and difficult. Some people may limp or avoid putting weight on the injured leg. Severe injuries may prevent the person from walking at all. Limited Range of Motion Another sign of knee ligament tear symptoms is stiffness or restricted movement. The knee may not fully bend or straighten due to swelling and ligament damage. Popping Sound at the Time of Injury Many individuals report hearing a popping sound at the moment the injury occurs. This popping sensation is commonly associated with serious knee ligament injuries, particularly ACL tears. Causes of Knee Ligament Tear Several factors can cause a knee ligament injury. These injuries frequently occur during sports activities or sudden movements. Common causes include: Sports Activities Sports that involve jumping, running, or sudden direction changes can place stress on the knee ligaments and cause injuries. Sudden Twisting Movements Twisting the knee while the foot remains planted on the ground can damage the knee joint ligaments. Direct Impact to the Knee A strong blow to the knee during sports or accidents can lead to a knee ligament tear. Improper Landing Landing incorrectly after a jump can put excessive pressure on the knee ligaments. Risk Factors for Knee Ligament Injuries Certain factors increase the likelihood of developing knee ligament tear symptoms. These include: Participation in high-impact sports Weak thigh or hamstring muscles Poor exercise techniques Inadequate warm-up before physical activity Previous knee injuries Athletes involved in football, basketball, and skiing are particularly vulnerable to knee ligament injury. Diagnosis of Knee Ligament Injury When a patient experiences knee ligament tear symptoms, a proper medical evaluation is necessary. Doctors typically perform: Physical Examination The doctor examines the knee for swelling, tenderness, and instability. Imaging Tests Medical imaging helps confirm the diagnosis and determine the severity of the injury. Common imaging tests include: X-rays MRI scans Ultrasound MRI scans are particularly effective for examining knee ligaments and identifying ligament tears. Knee Ligament Injury Treatment Options Treatment depends on the severity of the injury and the patient’s lifestyle. Non-Surgical Treatment Many mild injuries can be treated without surgery. 1.Rest and Ice – Resting the knee and applying ice packs can reduce swelling and pain. 2.Knee Braces – Braces support the knee joint and help stabilize damaged knee joint ligaments during recovery. 3.Physiotherapy – Physical therapy is an essential part of knee ligament injury treatment. It strengthens the muscles around the knee and improves joint stability. Surgical Treatment Severe injuries may require knee ligament surgery. Surgical procedures are performed to repair or reconstruct the damaged ligament using graft tissue. Modern knee ligament surgery techniques often use arthroscopy, a minimally invasive method that allows faster recovery and less scarring. Recovery After Knee Ligament Surgery Recovery from knee ligament surgery typically occurs in stages. Initial Healing Phase Swelling and pain are managed while gentle movement begins. Rehabilitation Phase Physiotherapy helps restore strength and flexibility. Return to Activity Patients gradually return to normal
Shoulder Immobilizer: Types, Uses, Benefits & When Doctors Recommend It
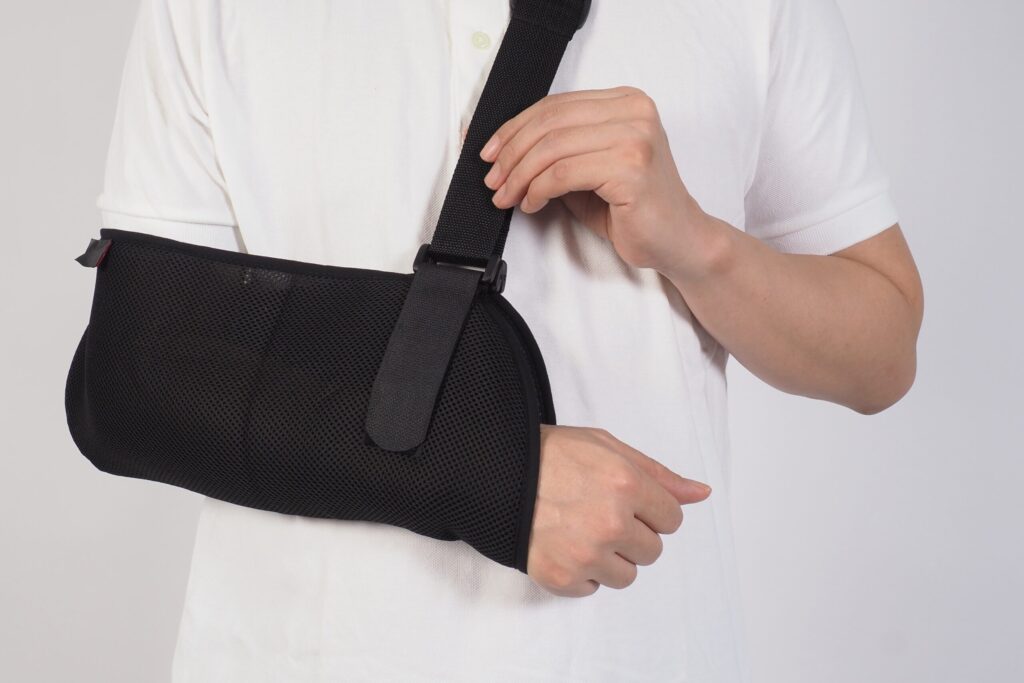
Shoulder Immobilizer: Types, Uses, Benefits & When Doctors Recommend It Shoulder injuries can significantly restrict arm movement and affect daily activities. A shoulder immobilizer is specifically designed to stabilize the shoulder joint, reduce excessive motion, and support healing after injury, surgery, or shoulder instability. People searching for a shoulder immobilizer often want to know how it differs from a sling, whether it helps manage left shoulder pain causes, and when doctors actually recommend using one for recovery. Unlike a basic arm sling that mainly supports the forearm, a shoulder immobilizer keeps the arm firmly secured against the body to prevent rotation and sudden movement. This guide explains the types of shoulder immobilizers, their uses and benefits, and when doctors recommend a shoulder immobilizer for safe healing and long-term shoulder stability. What Is a Shoulder Immobilizer? A shoulder immobilizer is a structured orthopedic support brace designed to keep the arm securely positioned against the body, restrict shoulder movement, reduce joint strain, and promote proper healing after injury or surgery. Shoulder immobilizers are commonly recommended for people experiencing: • Shoulder dislocation• Rotator cuff injury• Shoulder instability• Post-surgical recovery• Severe left shoulder pain By stabilizing the joint and limiting unnecessary motion, a shoulder immobilizer protects injured ligaments, tendons, and muscles during the early healing phase. Types of Shoulder Immobilizers Different types of shoulder immobilizers are available depending on the severity of injury and the level of support required. Choosing the right type depends on medical advice and recovery needs. 1. Standard Shoulder Immobilizer A standard shoulder immobilizer includes an arm pouch and supportive straps that wrap aroundthe torso. • Provides firm joint stabilization• Limits shoulder rotation• Supports surgical recovery• Keeps arm secured to body 2. Shoulder Immobilizer Belt A shoulder immobilizer belt provides additional torso compression and enhanced restriction compared to a regular sling. • Offers stronger chest support• Prevents accidental arm movement• Enhances joint restriction• Helps manage shoulder instability 3. Universal Shoulder Immobilizer A universal shoulder immobilizer is adjustable and suitable for either shoulder. • Fits multiple body sizes• Easy to wear and remove• Suitable for mild injuries• Provides balanced positioning Selecting the correct shoulder immobilizer ensures effective stabilization and comfort during recovery. Common Left Shoulder Pain Causes Understanding left shoulder pain causes helps determine when immobilization is necessary and when rehabilitation may be more appropriate. Common left shoulder pain reasons include: • Rotator cuff tear• Frozen shoulder condition• Muscle strain injury• Shoulder instability episodes• Tendon inflammation In cases where movement increases pain or instability, doctors may recommend a shoulder immobilizer to reduce strain and allow proper tissue healing. Shoulder Immobilizer Uses The uses of a shoulder immobilizer extend beyond simple support. It plays an important role in protecting the joint and preventing further injury. Common shoulder immobilizer uses include: • Stabilizing the joint after dislocation• Supporting post-surgical healing• Preventing excessive shoulder rotation• Reducing swelling and inflammation• Protecting healing ligaments Doctors often prescribe a shoulder immobilizer before starting shoulder stretching exercises or strengthening programs. Benefits of a Shoulder Immobilizer Using a shoulder immobilizer correctly provides several therapeutic benefits during the acute injury phase. Key benefits include:• Reduces joint movement• Controls acute shoulder pain• Prevents recurrent dislocation• Maintains proper joint alignment• Promotes safe tissue healing These benefits are most effective when the shoulder immobilizer is worn consistently as prescribed. When Doctors Recommend a Shoulder Immobilizer Doctors commonly recommend a shoulder immobilizer as part of conservative or post-operative treatment for joint injuries and instability. Medical situations where doctors may recommend it: • After shoulder dislocation• Following rotator cuff repair• During severe shoulder instability• Post-fracture stabilization• Acute left shoulder pain causes A shoulder immobilizer is usually advised before gradually transitioning into shoulder stretching exercises and later a full shoulder workout. Non-Surgical TreatmentTransition to Shoulder Stretching Exercises Once the initial healing phase is complete and pain is under control, gradual movement becomes essential to prevent joint stiffness and muscle tightness. Controlled motion helps restore flexibility and prepares the shoulder for strengthening. Shoulder stretching exercises may include: • Pendulum arm movements• Assisted with wall climbing• Gentle external rotations• Passive range-of-motion drills These controlled shoulder stretching exercises gradually restore flexibility, improve range of motion, reduce stiffness, and safely rebuild mobility after shoulder immobilizer use under proper medical supervision. Full Shoulder Workout After Recovery After the healing phase is complete and pain is well controlled, gradual strengthening exercises are essential to restore shoulder stability, improve muscle balance, and prevent recurrent shoulder instability. A full shoulder workout may include: • Rotator cuff strengthening• Resistance band exercises• Scapular stabilization drills• Light dumbbell movements A structured full shoulder workout rebuilds strength, improves stability, restores movement control, and reduces future shoulder instability after prolonged immobilization. How to Choose the Right Shoulder Immobilizer Choosing the right shoulder immobilizer depends on the type of injury, stability requirement, recovery stage, and comfort needs. Proper selection ensures effective joint support and prevents complications during healing. Key factors to consider: • Severity of injury and instability level• Requirement of additional torso strap support• Comfort, fit, and adjustability features• Breathable and skin-friendly material design• Doctor’s recommendation and medical guidance Injury severity, proper fit, breathable material, and medical advice are essential when selecting a shoulder immobilizer to ensure correct alignment, stability, comfort, and safe recovery. How to Use a Shoulder Immobilizer Correctly Correct usage of a shoulder immobilizer is essential to ensure proper joint stabilization, prevent complications, and support safe tissue healing during the recovery period Best practices include: • Wear it exactly as prescribed by your doctor• Do not remove without medical advice• Keep elbow positioned at 90 degrees• Ensure shoulder remains close to body• Keep straps secure but not overly tight• Remove only during approved exercises• Maintain proper hygiene under brace• Attend scheduled follow-up visits A shoulder immobilizer should be worn continuously during the initial healing phase unless your doctor advises otherwise. Removing it too early may increase the risk of shoulder instability or delayed recovery. FAQs – Shoulder Immobilizer What is the difference between a sling and a shoulder immobilizer? A sling supports the forearm, while
Locking and Unlocking of Knee Joint: Causes, Symptoms & Treatment
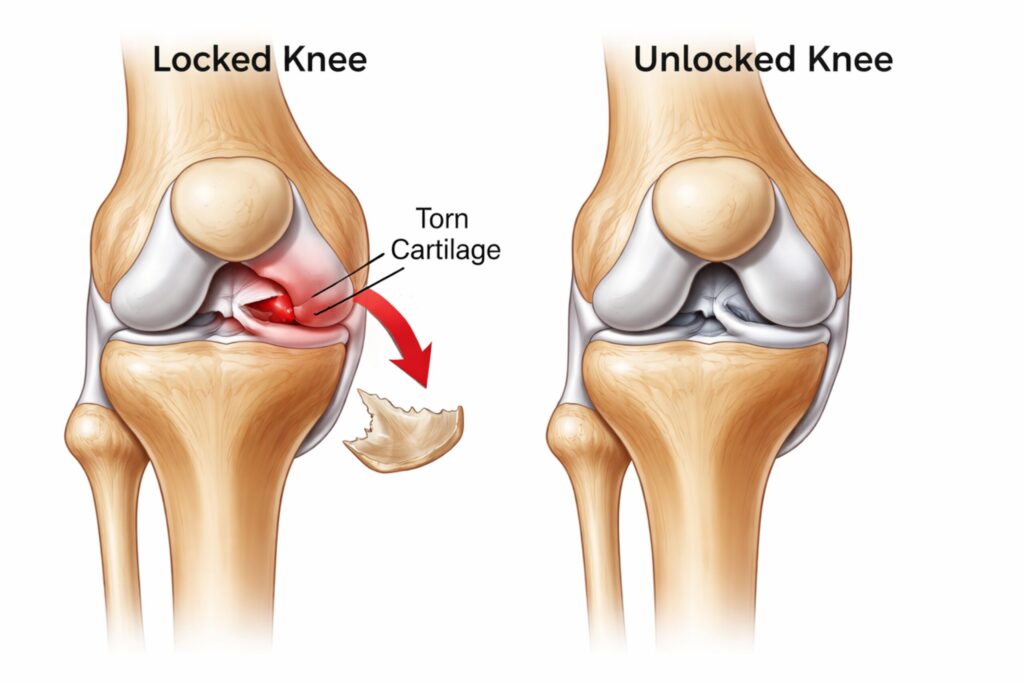
Locking and Unlocking of Knee Joint: Causes, Symptoms & Treatment The locking and unlocking of the knee joint is a condition that can significantly interfere with daily activities such as walking, climbing stairs, squatting, or even standing for long periods. Many patients describe it as a sudden “stuck” feeling in the knee joint, where the knee refuses to bend or straighten completely. Sometimes it unlocks suddenly with a click or pop, often accompanied by discomfort or instability. Understanding the locking and unlocking of the knee joint requires knowledge of knee structure, biomechanics, injury patterns, and available treatment options. In this comprehensive and user-friendly guide, we will discuss the anatomy, causes, symptoms, diagnosis, and management of this condition in detail. What Is Locking and Unlocking of Knee Joint? The locking and unlocking of knee joint refers to a mechanical or functional disturbance in which the knee becomes temporarily fixed in one position. It may remain bent (flexed) or straight (extended) and require effort, manipulation, or movement to return to normal motion. There are two main types: 1. True Locking True locking occurs when something physically blocks normal knee joint movement, such as a torn cartilage fragment. 2. Pseudo Locking Pseudo locking occurs due to severe knee joint pain, swelling, or muscle spasm without a structural blockage. To understand this better, it is important to answer the question: What type of joint is the knee? The knee is a modified hinge joint. While it primarily allows bending and straightening, it also permits slight rotation. This rotational movement is essential for the natural locking and unlocking of knee joint mechanism. Knee Joint Anatomy: Understanding the Structure A clear understanding of knee joint anatomy helps explain why the locking and unlocking of knee joint occurs. The knee joint consists of three major bones: Femur (thigh bone) Tibia (shin bone) Patella (kneecap) These bones are supported by strong knee joint ligaments, including: Anterior Cruciate Ligament (ACL) Posterior Cruciate Ligament (PCL) Medial Collateral Ligament (MCL) Lateral Collateral Ligament (LCL) These ligaments maintain stability and guide proper knee joint movement. Additionally, the menisci (medial and lateral) act as shock absorbers between the femur and tibia. Smooth cartilage covers bone surfaces to reduce friction. If any part of this complex knee joint anatomy is injured, the natural locking and unlocking of knee joint process can be disrupted. How the Locking and Unlocking of Knee Joint Works The normal locking and unlocking of knee joint occur during full extension and flexion. This is known as the “screw-home mechanism. Locking Phase As the knee straightens fully, the tibia rotates slightly outward. The knee joint ligaments tighten. The joint becomes stable for standing. Unlocking Phase The popliteus muscle rotates the tibia inward. The ligaments relax slightly. The knee bends smoothly. When this mechanism is impaired due to injury or degeneration, abnormal locking and unlocking of knee joint episodes may occur. Common Causes of Locking and Unlocking of Knee Joint Several orthopedic conditions can cause abnormal locking and unlocking of knee joint: 1. Meniscus Tear A torn meniscus is one of the most common causes. A displaced cartilage fragment may block normal knee joint movement, leading to sudden locking. Symptoms include: Sharp knee joint pain Swelling Clicking sensation Inability to fully extend the knee 2. Ligament Injuries Damage to knee joint ligaments, especially ACL injuries, can cause instability. This instability may alter the normal locking and unlocking of the knee joint. 3. Loose Bodies Small fragments of bone or cartilage floating inside the knee joint can interfere with movement, causing unpredictable locking episodes. 4. Osteoarthritis Degeneration of cartilage affects knee joint anatomy, leading to rough surfaces and mechanical catching. This may disturb the locking and unlocking of knee joint. 5. Patellar Maltracking Improper alignment of the kneecap may cause abnormal pressure distribution, contributing to knee joint pain and disturbed movement patterns. Symptoms of Locking and Unlocking of Knee Joint Patients experiencing locking and unlocking of knee joint commonly report: Sudden inability to bend or straighten the knee A popping or clicking sound Swelling in the knee joint Recurrent knee joint pain Feeling of instability Sensation of something stuck inside If symptoms are frequent or worsening, professional evaluation is essential. Diagnosis of Locking and Unlocking of Knee Joint Accurate diagnosis is important for proper treatment. Clinical Examination The doctor evaluates: Range of motion Stability of knee joint ligaments Tenderness and swelling Pain during knee joint movement Imaging Tests X-Ray Checks bone alignment and arthritis changes. MRI Provides detailed information about: Meniscus tears Ligament injuries Cartilage damage Structural abnormalities affecting locking and unlocking of knee joint MRI is especially helpful in evaluating soft tissue structures within the knee joint anatomy. Non-Surgical Treatment Mild or early cases of locking and unlocking of knee joint can often be treated conservatively. 1. Rest and Activity Modification Avoid activities that worsen symptoms. 2. Ice Therapy Reduces swelling and inflammation. 3. Medications Anti-inflammatory drugs help relieve knee joint pain. 4. Physiotherapy A structured rehabilitation program improves: Muscle strength Stability of knee joint ligaments Range of knee joint movement Strengthening quadriceps and hamstrings supports proper locking and unlocking of knee joint function. Surgical Treatment If mechanical blockage persists, surgery may be required. Arthroscopic Surgery A minimally invasive procedure used to: Repair torn meniscus Remove loose bodies Reconstruct damaged knee joint ligaments Smooth cartilage surfaces Arthroscopy effectively restores normal locking and unlocking of the knee joint mechanics in many patients. Recovery time varies depending on the procedure but generally ranges from a few weeks to several months. Rehabilitation and Recovery Proper rehabilitation is essential after treatment for the locking and unlocking of the knee joint. Rehabilitation focuses on: Gradual restoration of knee joint movement Strengthening surrounding muscles Improving balance and coordination Reducing the recurrence of knee joint pain Adherence to physiotherapy significantly improves outcomes. Prevention of Locking and Unlocking of Knee Joint Preventive strategies include: Maintaining a healthy body weight Strength training for lower limb muscles Warm-up before sports Avoiding sudden twisting movements Early treatment of ligament injuries Healthy knee
How to Speed Up Muscle Strain Recovery in Athletes

How to Speed Up Muscle Strain Recovery in Athletes Muscle injuries are one of the most common problems athletes face. Whether you are a professional player or a fitness enthusiast, a muscle strain can interrupt training, reduce performance, and delay competition plans. Many athletes search for how to speed up muscle strain recovery because they want to return to sports safely and quickly. The truth is, recovery cannot be rushed artificially, but it can be optimized with the right approach. This guide explains the healing process, recovery stages, rehabilitation principles, and safe return-to-play strategies in a structured and easy-to-understand format. Understanding Muscle Strain in Athletes A muscle strain occurs when muscle fibers are overstretched or torn due to sudden force or excessive load. This commonly happens during sprinting, jumping, rapid direction changes, or heavy lifting. Muscle strains are classified into three grades. Mild strains involve microscopic damage and cause slight discomfort. Moderate strains include partial tears and noticeable weakness. Severe strains involve complete tears and significant loss of muscle function. Athletes frequently experience strains in the hamstrings, quadriceps, calves, and lower back. A muscle strain in back often develops due to improper lifting mechanics or weak core stability. Similarly, an abdominal muscle strain is common in sports that involve twisting movements, such as cricket, tennis, and throwing events. Understanding the severity of injury is the first step toward knowing how to heal muscle strain effectively. The Healing Process: What Happens Inside the Muscle To understand how to speed up muscle strain recovery, it is important to know how muscles heal. Muscle healing occurs in three main phases: 1. Inflammatory Phase (First 72 Hours) The body sends blood and immune cells to the injured area. Swelling and pain are common during this stage. This is a protective response. 2. Repair Phase (3 Days to 3 Weeks) New muscle fibers begin forming. Collagen develops to rebuild damaged tissue. 3. Remodeling Phase (3 Weeks and Beyond) The new tissue becomes stronger and more organized. Gradual strengthening is essential during this phase. If rehabilitation is not structured properly, scar tissue may form incorrectly, increasing the risk of re-injury. Early Management: The First 72 Hours Matter The initial phase determines how quickly and safely recovery progresses. During the first 48–72 hours, the goal is to control inflammation. Rest is important, but complete immobility should be avoided unless the injury is severe. Ice application for short intervals helps reduce swelling and pain. Compression and elevation may further assist in controlling inflammation. This early care forms the foundation of how to treat muscle strain safely and effectively. When and How to Start Movement Many athletes make the mistake of either returning too early or resting for too long. Both can delay healing. After the initial inflammatory phase, gentle, pain-free movement should begin. Controlled activation improves blood circulation and supports proper alignment of healing fibers. Light stretching without pain, simple mobility exercises, and isometric contractions can help restore muscle function. For example, in a muscle strain in back, controlled core activation and posture correction exercises support recovery. In an abdominal muscle strain, breathing exercises and gentle trunk stabilization are helpful during early stages. This balanced approach is essential for those wondering how to cure muscle strain efficiently. Strengthening Phase: Building Back Muscle Capacity Once pain reduces and movement improves, strengthening becomes critical. Muscles heal stronger when gradually exposed to controlled resistance. At this stage, light resistance exercises, band training, and progressive loading are introduced. Eccentric strengthening is particularly beneficial because it improves muscle control and resilience. Athletes must avoid aggressive stretching or heavy loading too soon. Progressive strengthening ensures safe tissue remodeling and reduces recurrence risk. If someone asks how to heal muscle strain completely, the answer always includes structured strengthening, not just rest. The Role of Nutrition in Faster Recovery Nutrition plays a significant role in muscle repair. Protein supports muscle fiber regeneration. Athletes recovering from a muscle strain should ensure adequate daily protein intake from balanced sources. Hydration is equally important because fluid balance supports circulation and cellular repair. Anti-inflammatory nutrients such as omega-3 fatty acids, leafy vegetables, and antioxidant-rich foods can support the healing process. However, nutrition works best when combined with proper rehabilitation. Sleep and Hormonal Recovery Sleep is often underestimated in injury recovery. During deep sleep, growth hormone secretion increases, accelerating tissue repair. Athletes should prioritize 7–9 hours of quality sleep during the healing period. Without proper rest, even the best rehabilitation program may not deliver optimal results. Special Considerations for Back and Abdominal Strains A muscle strain in back requires attention to posture, hip mobility, and core strength. Weak supporting muscles can overload the lower back, delaying recovery. An abdominal muscle strain requires gradual progression in rotational movements. Sudden twisting or aggressive core workouts too early can worsen the injury. These specific adjustments are essential when considering how to speed up muscle strain recovery in athletes participating in rotational or lifting sports. Safe Return to Sports Returning too early is one of the most common reasons for re-injury. Before returning to full training, the athlete should have: Full pain-free range of motion Nearly equal strength compared to the uninjured side Ability to perform sport-specific drills without discomfort No swelling after practice sessions Gradual return-to-play progression ensures long-term success. Common Mistakes That Delay Recovery Many athletes unknowingly slow down recovery by: Ignoring mild pain Skipping rehabilitation exercises Returning to competition too soon Not correcting training errors Overstretching in the early stages Understanding these mistakes is part of knowing how to treat muscle strain correctly. Realistic Recovery Timeline Recovery depends on severity. Mild strains may heal within one to two weeks. Moderate injuries typically require three to six weeks. Severe tears may take several months and sometimes need medical supervision. Patience combined with structured rehabilitation is the safest path forward. FAQs How long does a muscle strain usually take to heal? Mild strains heal within 1–2 weeks, moderate injuries may take 3–6 weeks, and severe tears can require several months. What
Shoulder Bone Fracture Treatment: Symptoms and Care

Shoulder Bone Fracture Treatment: Symptoms and Care A shoulder injury can be painful and frightening, especially when it involves a broken bone. Understanding shoulder bone fracture treatment is important so that patients receive timely care, avoid complications, and return to normal activities safely. The shoulder is a complex joint made up of bones, ligaments, tendons, and muscles. When any part of this structure is damaged, movement and daily function can be affected. In this detailed guide, you will learn about symptoms, causes, diagnosis, treatment options, recovery process, and related conditions such as shoulder ligament injuries and frozen shoulder. The goal is to provide clear, easy-to-understand, and medically accurate information. What Is a Shoulder Bone Fracture? A shoulder bone fracture occurs when one of the bones in the shoulder region breaks due to trauma or excessive force. The shoulder consists of three main bones: Clavicle (collarbone) Scapula (shoulder blade) Proximal humerus (upper arm bone) A fracture can occur in any of these bones, but clavicle and proximal humerus fractures are most common. Immediate shoulder bone fracture treatment is necessary to reduce pain, ensure proper bone alignment, and prevent long-term stiffness or deformity. Common Causes of Shoulder Bone Fracture Understanding the cause helps doctors decide the right shoulder fracture treatment plan. 1. Road Traffic Accidents High-impact injuries from bike or car accidents are a major cause. 2. Sports Injuries Falls during cricket, football, kabaddi, or gym workouts may lead to fractures. 3. Fall on an Outstretched Arm This is common in elderly patients. 4. Osteoporosis Weak bones increase fracture risk, especially in older adults. Early diagnosis ensures proper shoulder bone fracture treatment and faster healing. Symptoms of Shoulder Bone Fracture Recognizing symptoms quickly helps prevent complications. Severe Shoulder Pain Intense shoulder pain immediately after injury. Swelling and Bruising Visible swelling around the shoulder joint. Limited Movement Difficulty lifting the arm. Deformity In some cases, the shoulder may look uneven or displaced. If you experience these symptoms, seek immediate medical care. Diagnosis of Shoulder Bone Fracture Doctors use the following methods: Physical Examination Checking swelling, tenderness, and movement restriction. X-Ray Confirms the location and severity of the fracture. CT Scan Used in complex fractures for surgical planning. Proper diagnosis guides the correct shoulder bone fracture treatment strategy. Types of Shoulder Bone Fractures Treatment depends on fracture type. Non-Displaced Fracture Bone remains aligned. Usually shown to be stable on X-ray. Displaced Fracture Bone fragments are separated. Comminuted Fracture The bone breaks into multiple pieces. Each type requires a different shoulder fracture treatment approach. Shoulder Bone Fracture Treatment Options The method of shoulder bone fracture treatment depends on severity, patient age, and activity level. Non-Surgical Shoulder Bone Fracture Treatment Many shoulder fractures heal without surgery. Sling Immobilization Arm is supported in a sling for 3–6 weeks. Pain Management Medications to control shoulder pain. Physiotherapy Gentle exercises after initial healing to prevent stiffness. Non-surgical treatment is common in minor fractures and elderly patients. Surgical Shoulder Bone Fracture Treatment Surgery may be required when: Bones are severely displaced Fracture involves joint surface Multiple bone fragments exist Surgical Methods Plate and screw fixation Rod fixation Shoulder replacement (in severe cases) Surgery ensures stable bone healing and better long-term function. Recovery Timeline After Shoulder Bone Fracture Healing usually takes 6 to 12 weeks, depending on severity. First 2 Weeks Pain and swelling control. 3–6 Weeks Gradual arm movement exercises. 6–12 Weeks Strength training and physiotherapy. Following the correct shoulder bone fracture treatment plan improves outcomes. Shoulder Fracture Treatment vs Shoulder Ligament Tear Treatment Sometimes a fracture is accompanied by soft tissue damage. Shoulder Fracture Treatment Bone break due to fall or trauma Managed with sling, medicines, or surgery Focus on proper bone healing Shoulder Ligament Tear Treatment Ligament injury affects joint stability Treated with rest and physiotherapy Severe cases may need arthroscopic repair Both conditions require accurate diagnosis for complete shoulder recovery. Frozen Shoulder After Fracture Some patients develop stiffness after injury or surgery. What Is Frozen Shoulder? Frozen shoulder causes pain and restricted movement. Frozen Shoulder Treatment Options Physiotherapy Anti-inflammatory medications Joint injections In rare cases, arthroscopic release Early rehabilitation reduces the risk of needing best treatment for frozen shoulder later. Managing Shoulder Pain During Recovery Persistent shoulder pain can delay healing. Tips: Follow doctor’s instructions Avoid heavy lifting Attend regular physiotherapy Use ice packs as advised Pain gradually decreases as healing progresses. Complications If Not Treated Properly Ignoring or delaying shoulder bone fracture treatment may lead to: Permanent stiffness Malunion (improper bone healing) Chronic shoulder pain Joint arthritis Muscle weakness Timely care prevents these issues. Prevention Tips for Shoulder Injuries Wear protective sports gear Maintain bone strength with calcium Improve balance to prevent falls Strengthen shoulder muscles Prevention is always better than long-term treatment. When to See an Orthopedic Specialist Consult a specialist if: Pain is severe Movement is limited Swelling increases Deformity is visible Early orthopedic evaluation ensures correct shoulder fracture treatment and better recovery. FAQs How long does shoulder bone fracture treatment take? Healing usually takes 6–12 weeks, but full recovery may take 3–4 months with physiotherapy. Can shoulder fractures heal without surgery? Yes, many fractures heal with sling support and physiotherapy. What is the best treatment for frozen shoulder after fracture? The best treatment for frozen shoulder includes physiotherapy, medication, and sometimes joint injections. Is shoulder pain normal after fracture healing? Mild discomfort is normal during recovery, but severe or persistent pain should be evaluated. What is the difference between shoulder ligament tear treatment and fracture treatment? Fracture treatment focuses on bone healing, while shoulder ligament tear treatment repairs soft tissue structures. Conclusion A shoulder injury should never be ignored. Proper shoulder bone fracture treatment ensures correct healing, reduces pain, and restores full movement. Early diagnosis, structured rehabilitation, and expert orthopedic care are key to successful recovery. Understanding symptoms, following medical advice, and completing physiotherapy are essential steps toward regaining shoulder strength and function. If you experience persistent shoulder pain or limited movement after injury, seek medical evaluation immediately.


