
What You Need to Know About Ankle Tendonitis and Its Causes
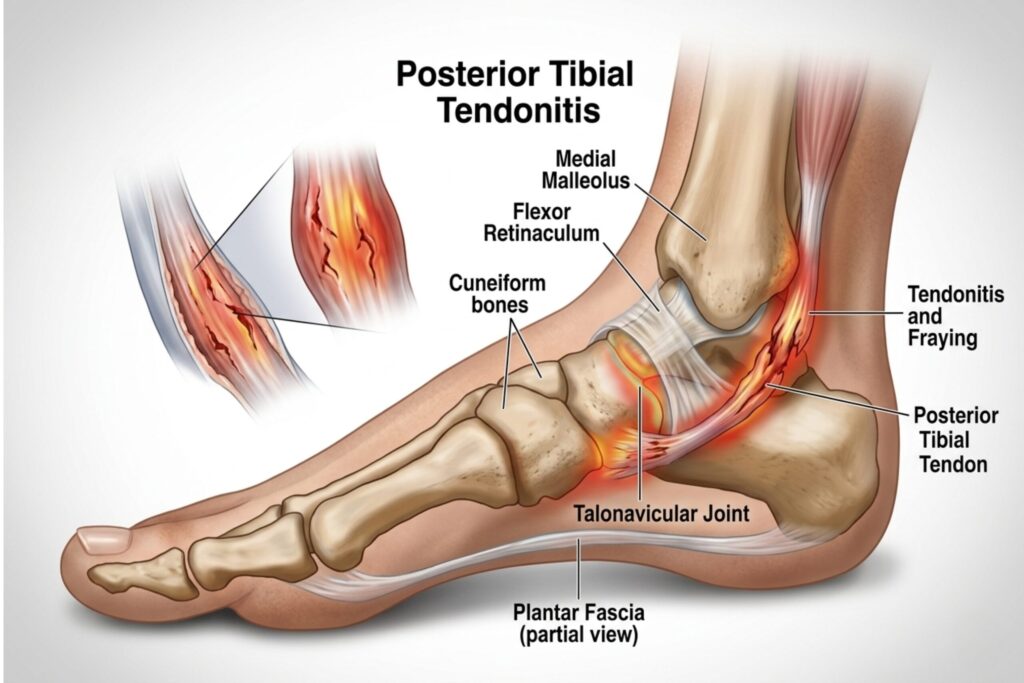
What You Need to Know About Ankle Tendonitis and Its Causes Ankle tendonitis is a common condition that causes pain, swelling, and difficulty in movement around the ankle joint. It usually develops due to overuse, sudden injury, or repetitive strain on the tendons that play a crucial role in maintaining ankle stability and smooth motion. These tendons help connect muscles to bones, allowing you to walk, run, and perform everyday activities with ease. Whether you are an athlete, someone with an active lifestyle, or even a person who walks or stands for long hours, an ankle tendon injury can significantly affect your daily routine and mobility. In some cases, ignoring early symptoms may lead to more serious issues such as chronic pain or even a tendon tear. Factors like improper footwear, lack of warm-up, and poor posture can also contribute to the condition. What is Tendonitis Ankle Tendonitis ankle refers to inflammation or irritation of the tendons surrounding the ankle joint. Tendons are strong connective tissues that attach muscles to bones and help in smooth joint movement. When these tendons become inflamed due to stress or injury, it can lead to pain and reduced mobility. In some cases, it may also involve an Ankle Tendon Tear if not treated on time. Common Tendons Affected Achilles tendon Peroneal tendons Posterior tibial tendon Anterior tibial tendon Each plays a vital role in walking, running, and maintaining balance. Causes of Tendonitis Ankle Understanding Ankle Tendonitis Causes helps in early prevention and better treatment outcomes. Common Causes Overuse or repetitive movements (running, jumping, sports) Sudden increase in physical activity Improper footwear that lacks support Weak or tight calf muscles Ankle injuries or sprains Medical and Structural Causes Flat feet or high arches Poor walking or running posture Age-related tendon degeneration Chronic conditions like arthritis Ignoring early signs may increase the risk of a severe ankle tendon injury. Symptoms of Tendonitis Ankle Recognizing ankle pain from tendonitis early can prevent complications. Symptoms may vary depending on severity. Common Symptoms Pain around the ankle, especially during movement Swelling and tenderness Stiffness, especially in the morning Warmth around the affected area Advanced Symptoms Difficulty walking or standing Weakness in the ankle from ankle ligament injury Popping or snapping sensation Signs of a possible tendon tear If pain persists, it may indicate a deeper issue requiring medical evaluation. Risk Factors Some people are more likely to develop ankle tendonitis due to lifestyle or health conditions. Key Risk Factors Athletes and runners People with physically demanding jobs Improper warm-up before exercise Obesity (extra stress on joints) Aging (reduced tendon flexibility) Other Contributing Factors Diabetes Poor circulation Previous ankle injuries Managing these risk factors can reduce the chances of recurrence. Diagnosis and Medical Tests Proper diagnosis is essential to differentiate between simple inflammation and an ankle tendon tear. Clinical Examination Doctors assess: Pain location Swelling Range of motion Walking pattern Diagnostic Tests X-rays (to rule out fractures) Ultrasound (to view tendon inflammation) MRI scan (to detect tears or severe damage) Early diagnosis helps in planning effective treatment and faster recovery. Treatment Options Treatment depends on the severity of tendonitis in the ankle. Most cases improve with conservative care. Non-Surgical Treatment 1. Rest and Activity Modification Avoid activities that worsen pain to allow healing. 2. Ice Therapy Apply ice packs for 15–20 minutes to reduce swelling. 3. Medications Doctors may prescribe anti-inflammatory medicines for pain relief. 4. Supportive Devices Ankle braces Orthotic shoe inserts Physiotherapy and Exercises Tendonitis ankle exercises play a key role in recovery: Calf stretching Heel raises Resistance band exercises Balance training These help strengthen tendons and improve flexibility. Surgical Treatment In rare cases, surgery may be needed for: Severe ankle tendon injury Complete tendon tear Chronic pain not improving with therapy Recovery and Rehabilitation Tendonitis ankle recovery time varies based on severity and treatment approach. General Recovery Timeline Mild cases: 2–3 weeks Moderate cases: 4–8 weeks Severe cases: 2–3 months or more Rehabilitation Tips Follow prescribed exercises regularly Avoid early return to sports Gradually increase activity level Maintain proper footwear support Consistency in rehabilitation is key to preventing re-injury. Prevention Tips Preventing tendonitis in the ankle is easier than treating it. Practical Prevention Strategies Warm up before exercise Wear supportive footwear Avoid sudden increase in activity Maintain a healthy weight Stretch regularly Lifestyle Tips Stay active but avoid overtraining Strengthen ankle and leg muscles Listen to your body’s pain signals These steps significantly reduce the risk of ankle tendon injury. When to See a Doctor Seek medical attention if you notice: Persistent ankle pain for more than a few days Severe swelling or bruising Difficulty walking Sudden sharp pain (possible tendon tear) Early treatment can prevent long-term complications and improve recovery outcomes. FAQs What is the fastest way to heal ankle tendonitis? Rest, ice therapy, and physiotherapy exercises are the most effective ways to speed up healing. Avoid activities that strain the ankle. How long does tendonitis ankle recovery take? Recovery time ranges from 2 weeks to 3 months depending on severity and treatment. Can tendonitis in the ankle lead to a tendon tear? Yes, untreated tendonitis can weaken tendons and increase the risk of an ankle tendon tear. What exercises help in tendonitis ankle? Stretching, strengthening, and balance exercises help improve flexibility and prevent re-injury. Is walking good for ankle tendonitis? Light walking may help, but excessive walking can worsen the condition. Follow medical advice. Conclusion Tendonitis ankle is a manageable condition when identified early and treated properly. Understanding its causes, symptoms, and recovery process helps you take timely and informed action before the condition worsens. Ignoring early signs like pain or stiffness can increase the risk of complications such as chronic inflammation or even a tendon tear. At the Centre for Sports Injury, expert care and a patient-focused approach play a key role in effective recovery. Under the guidance of Dr. Himanshu Gupta, patients receive proper diagnosis, personalized treatment plans, and rehabilitation support tailored to their condition. Seeking timely consultation and following professional advice
Knee Pain While Climbing Stairs: Causes, Symptoms & Best Treatment Options
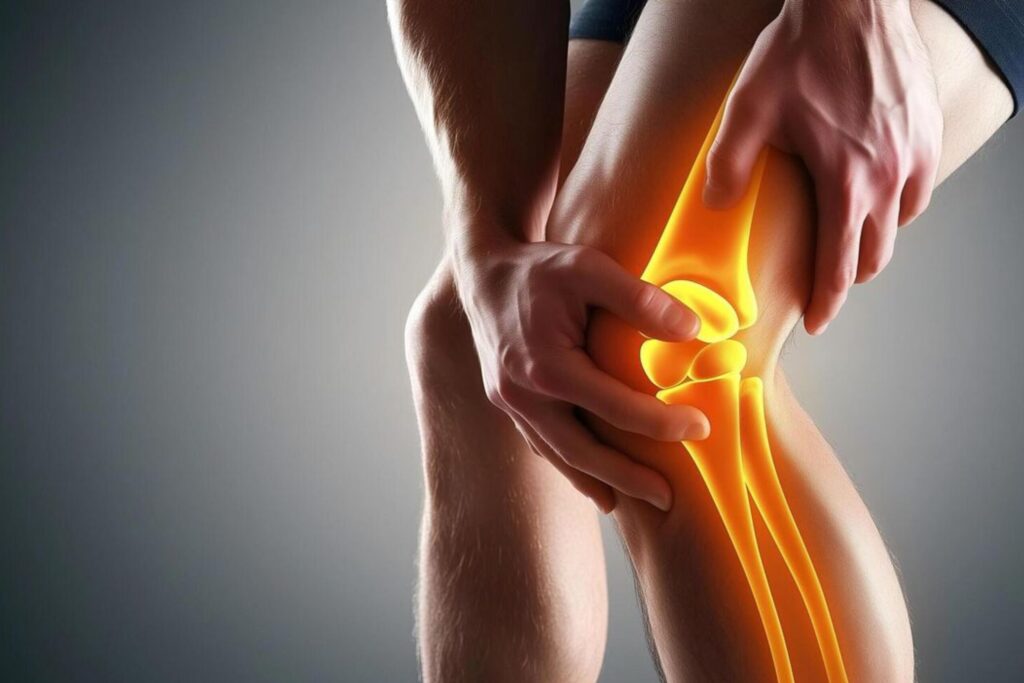
Knee Pain While Climbing Stairs: Causes, Symptoms & Best Treatment Options Knee pain while climbing stairs is a common yet often ignored problem that can significantly affect your daily life. Whether you feel a sharp pain, stiffness, or discomfort in your knee joint, this issue may indicate an underlying condition that needs timely attention. Climbing stairs puts extra pressure on the knees, making it one of the earliest activities where knee problems become noticeable. In this detailed guide, we will explore the causes, symptoms, diagnosis, and best treatment options for knee pain, helping you understand when to take action and how to recover effectively. What is Knee Pain While Climbing Stairs? Knee pain while climbing stairs occurs when the knee joint experiences stress beyond its tolerance. The knee bears up to 3–4 times your body weight when you climb stairs, which can aggravate existing issues in the joint. This type of pain is often associated with: Weak muscles Cartilage damage Joint inflammation Poor biomechanics It may also be linked to broader knee pain causes or chronic knee joint pain conditions. Common Causes of Knee Pain While Climbing Stairs Understanding the root of knee pain is essential for proper treatment. 1. Patellofemoral Pain Syndrome (Runner’s Knee) This is one of the most common causes of knee pain while climbing stairs. It occurs when the kneecap (patella) does not move properly over the joint. Symptoms: Pain around the front of the knee Clicking or grinding sensation Pain while squatting or climbing 2. Osteoarthritis Knee pain while climbing stairs is a common problem caused by weak muscles, joint wear, or injury. It can lead to discomfort, stiffness, and reduced mobility. Early diagnosis, simple exercises, and proper knee pain treatment can help relieve pain and improve daily movement. Risk factors: Age Obesity Previous injuries 3. Ligament Injuries Ligament injuries like ACL, PCL, or MCL can cause instability in the knee joint. This leads to leg knee pain, weakness, and difficulty while climbing stairs. You may also feel swelling or the knee giving way during movement. 4. Meniscus Tear A torn cartilage in the knee joint can lead to: Locking sensation Swelling Sharp pain during movement 5. Tendinitis Inflammation of tendons around the knee due to overuse can cause pain, especially during stair climbing. Symptoms You Shouldn’t Ignore If you have knee pain while climbing stairs, watch for signs like swelling, stiffness, weakness, or a popping sound. Difficulty bending or straightening the knee may also occur. These symptoms should not be ignored. Persistent pain in the knee joint Swelling or stiffness Difficulty bending or straightening the knee Cracking or popping sounds Weakness in the leg Ignoring these symptoms can make knee pain worse over time. It may increase swelling, stiffness, and damage in the knee joint. Early treatment helps reduce pain and prevents serious problems, making recovery faster and easier. How is Knee Pain Diagnosed? Proper diagnosis is crucial for effective knee joint pain treatment. Common Diagnostic Methods: Physical examination X-rays (to check bone structure) MRI (to assess soft tissues) Gait analysis At specialized centers like the Centre for Sports Injury, advanced diagnostic techniques are used to identify the exact cause of knee pain and create a personalized treatment plan. Best Treatment Options for Knee Pain While Climbing Stairs Treatment depends on the severity and underlying cause. Here are the most effective approaches: 1. Non-Surgical Treatments Most cases of knee pain treatment without surgery can be managed effectively with conservative methods: Rest & Activity Modification Avoid activities that put stress on the knee, such as excessive stair climbing or running. Physiotherapy Strengthening exercises improve muscle support around the knee. Medications Anti-inflammatory medicines help reduce pain and swelling. Knee Bracing Provides support and stability to the joint. 2. Exercises for Knee Pain Regular exercise for knee pain can significantly improve mobility and reduce discomfort. Quadriceps Strengthening Straight leg raises Wall sits Hamstring Stretch Improves flexibility and reduces strain Step-Ups (Controlled) Helps build strength gradually Cycling Low-impact activity for joint mobility 3. Advanced Non-Surgical Treatments PRP (Platelet-Rich Plasma) therapy Laser therapy Cryotherapy These therapies promote healing and reduce inflammation. 4. Surgical Treatment (If Required) If conservative treatments fail, surgery may be recommended: Arthroscopy Ligament reconstruction Knee replacement (in severe cases) Expert Care Matters For long-term relief, it is important to consult an experienced orthopedic specialist. At Centre For Sports Injury, patients receive expert care under Dr. Himanshu Gupta, a highly experienced orthopedic and sports injury specialist with over 15+ years of clinical expertise. He specializes in advanced knee treatments, minimally invasive procedures, and personalized rehabilitation programs to ensure faster recovery and long-term results. Prevention Tips for Knee Pain Preventing knee pain while climbing stairs is possible with simple lifestyle changes: Maintain a healthy weight Strengthen leg muscles regularly Use proper footwear Avoid sudden strain or overuse Warm up before exercise When Should You See a Doctor? Seek medical attention if: Pain persists for more than a week Swelling increases You cannot bear weight on your knee The knee feels unstable Early diagnosis helps identify the exact cause of knee pain quickly. It allows timely treatment, reduces the risk of complications, and improves recovery. Getting care early ensures better results and helps you return to normal activities faster. FAQs What is shoulder impingement? Shoulder impingement is a condition where the rotator cuff tendons become compressed in the shoulder joint, causing pain and restricted movement. Can shoulder impingement exercises cure the condition? In many cases, proper physiotherapy and shoulder impingement exercises can significantly reduce symptoms and restore shoulder function. How long does shoulder impingement recovery take? Recovery usually takes 4–8 weeks with proper rest, exercises, and physiotherapy. Is surgery required for shoulder impingement? Most patients improve with non-surgical treatments such as physiotherapy and shoulder impingement therapy. Which exercise is best for shoulder impingement? External rotation exercises and scapular strengthening exercises are among the most effective rehabilitation movements. Conclusion Knee pain while climbing stairs is not just a minor inconvenience—it can be an early sign of underlying
10 Shoulder Impingement Exercises to Reduce Pain and Improve Mobility
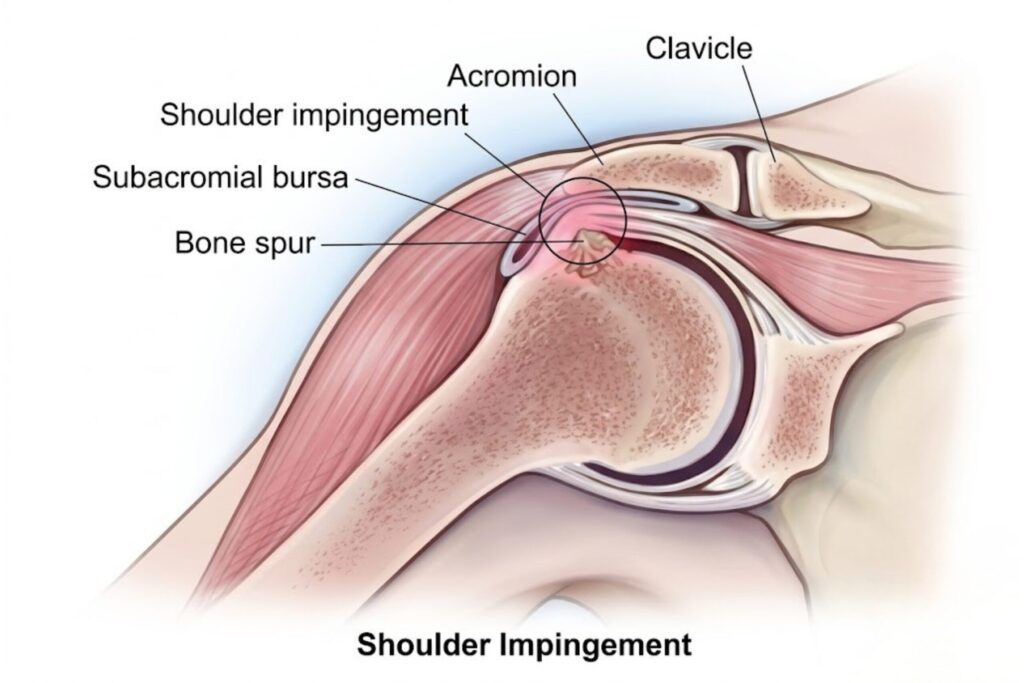
10 Shoulder Impingement Exercises to Reduce Pain and Improve Mobility Shoulder pain is a common problem among athletes, gym users, and people who perform repetitive overhead movements. One of the most frequent causes of shoulder discomfort is shoulder impingement, a condition where the tendons of the rotator cuff become compressed between the bones of the shoulder joint. Performing the right shoulder impingement exercises can help reduce pain, improve shoulder mobility, and strengthen surrounding muscles. These exercises are often recommended as part of shoulder impingement therapy or physiotherapy programs designed to restore normal shoulder function. In this guide, we will explain what shoulder impingement is, its causes, symptoms, and the best exercises that can support recovery and prevent future injuries. What is Shoulder Impingement Shoulder impingement occurs when the tendons of the rotator cuff muscles become irritated or compressed under the acromion, a part of the shoulder blade. This compression can lead to pain, inflammation, and limited shoulder movement. The condition is commonly referred to as shoulder impingement syndrome, which may develop gradually due to repetitive strain or improper shoulder mechanics. Key Shoulder Structures Involved Rotator cuff tendons Subacromial space Acromion (shoulder blade bone) Bursa (fluid-filled sac) Shoulder joint capsule When these structures become inflamed, normal shoulder movement becomes painful. Causes of Shoulder Impingement Several factors can lead to shoulder impingement syndrome. The condition often develops when shoulder tendons repeatedly rub against surrounding bones. Common Causes Repetitive overhead movements Poor shoulder posture Weak rotator cuff muscles Muscle imbalance around the shoulder Previous shoulder injuries Activities That Increase Risk Cricket bowling Tennis serves Swimming strokes Weightlifting overhead presses Manual labor involving lifting These repetitive actions place stress on the shoulder joint and may eventually cause impingement. Symptoms of Shoulder Impingement Symptoms of shoulder impingement usually develop gradually and worsen during arm movements. Common Symptoms Shoulder pain during arm lifting Pain while reaching overhead Weakness in the shoulder muscles Limited shoulder mobility Pain during sleep on the affected side Some patients may also experience clicking or discomfort during shoulder rotation. Early recognition of these symptoms is important for timely shoulder impingement treatment. Risk Factors Certain individuals have a higher risk of developing shoulder impingement syndrome. Risk Factors Include Athletes in overhead sports Age above 40 years Poor shoulder posture Rotator cuff weakness Repetitive shoulder strain People who spend long hours working at a computer or lifting heavy objects may also develop shoulder dysfunction over time. Diagnosis and Medical Tests Doctors diagnose shoulder impingement through a combination of physical examination and imaging tests. Physical Examination An orthopedic specialist may perform specific movement tests, such as: Neer impingement test Hawkins-Kennedy test Shoulder range of motion assessment Imaging Tests To confirm the diagnosis, doctors may recommend: X-ray – to detect bone abnormalities MRI scan – to evaluate rotator cuff tendons Ultrasound – to check soft tissue inflammation These tests help determine the severity of the condition and guide proper treatment. Treatment Options Treatment for shoulder impingement syndrome focuses on reducing inflammation, strengthening muscles, and restoring normal shoulder mechanics. Non-Surgical Treatment Most cases improve with conservative treatment methods. Rest and activity modification Anti-inflammatory medications Physiotherapy exercises Ice therapy for pain relief Medical Treatment If symptoms persist, doctors may recommend: Corticosteroid injections Advanced physiotherapy programs Arthroscopic shoulder surgery (in severe cases) However, exercise-based rehabilitation remains the most effective first-line approach. 10 Shoulder Impingement Exercises These shoulder impingement exercises are commonly used in physiotherapy to improve shoulder stability and strength. 1. Pendulum Exercise This gentle movement helps relax the shoulder joint. Steps: Lean forward slightly Let the affected arm hang down Move the arm in small circles 2. Wall Slide Exercise Helps improve shoulder mobility and posture. Steps: Stand facing a wall Place your forearms against it Slide arms upward slowly 3. External Rotation Exercise Strengthens the rotator cuff muscles. Steps: Hold a resistance band Keep your elbow close to your body Rotate the forearm outward slowly 4. Internal Rotation Exercise Improves shoulder stability. Steps: Attach the resistance band to a fixed object Pull the band inward across the body 5. Scapular Retraction Strengthens shoulder blade muscles. Steps: Sit upright Pull shoulder blades together Hold for a few seconds 6. Shoulder Blade Squeeze Improves posture and shoulder control. Steps: Sit or stand straight Squeeze shoulder blades gently 7. Arm Raise Exercise Enhances shoulder flexibility. Steps: Raise your arm slowly forward Stop if pain occurs 8. Cross-Body Stretch Improves shoulder flexibility. Steps: Bring one arm across the chest Use your opposite hand to stretch gently 9. Doorway Stretch Opens chest muscles and improves shoulder alignment. Steps: Place arms on the door frame Lean forward gently 10. Resistance Band Rows Strengthens upper back muscles. Steps: Hold the resistance band Pull your elbows backward slowly Perform these exercises under the guidance of a physiotherapist for safe recovery. Recovery and Rehabilitation Recovery from shoulder impingement syndrome usually takes several weeks, depending on the severity of the condition. Rehabilitation Tips Follow a regular physiotherapy program Avoid sudden overhead movements Gradually increase exercise intensity Maintain proper shoulder posture Consistent shoulder impingement therapy helps restore shoulder strength and prevent recurrence. Prevention Tips Preventing shoulder impingement involves maintaining good shoulder mechanics and muscle strength. Prevention Strategies Perform shoulder strengthening exercises Warm up before sports activities Maintain good posture Avoid repetitive strain Strengthen rotator cuff muscles Athletes should also include shoulder mobility training in their regular workout routines. When to See a Doctor You should consult a doctor if: Shoulder pain lasts more than two weeks Pain interferes with daily activities Arm weakness becomes noticeable Shoulder movement becomes severely restricted Early evaluation by an orthopedic specialist can prevent complications and speed up recovery. FAQs What is shoulder impingement? Shoulder impingement is a condition where the rotator cuff tendons become compressed in the shoulder joint, causing pain and restricted movement. Can shoulder impingement exercises cure the condition? In many cases, proper physiotherapy and shoulder impingement exercises can significantly reduce symptoms and restore shoulder function. How long does shoulder impingement recovery take? Recovery usually takes 4–8 weeks with
Top Causes of Knee Pain in Young Adults & How to Prevent It Early
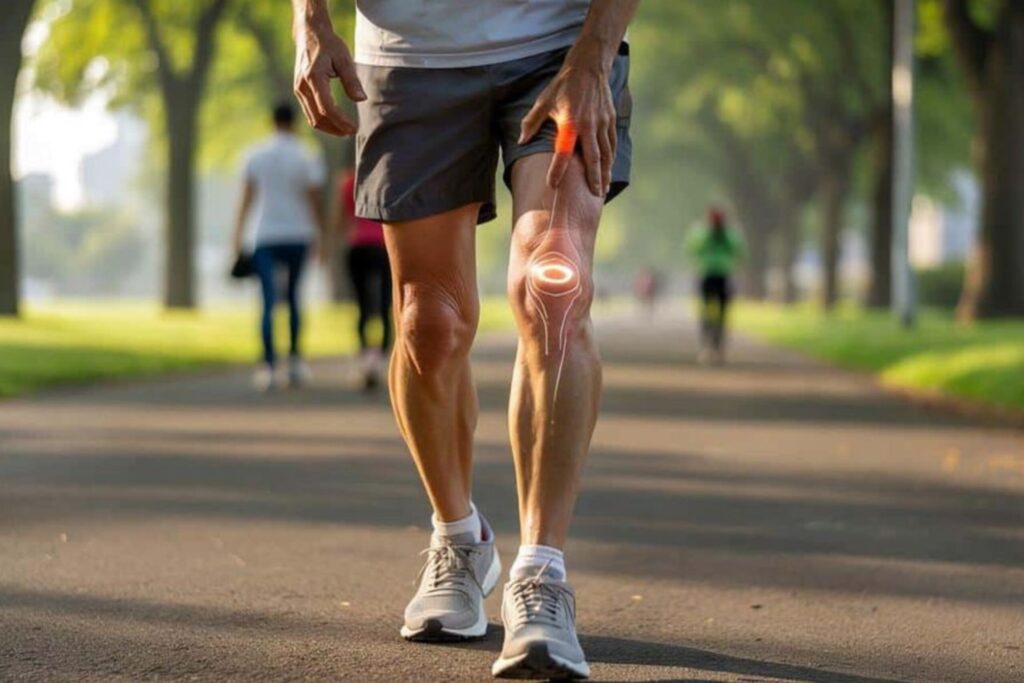
Top Causes of Knee Pain in Young Adults & How to Prevent It Early Knee pain is no longer limited to older individuals. Today, a growing number of young adults are experiencing discomfort, stiffness, and mobility issues in their knees due to modern lifestyle patterns, sports injuries such as knee ligament injury, and poor posture. Understanding the causes of knee pain in young adults is essential for early intervention, prevention, and long-term joint health. This comprehensive guide explores the root causes, symptoms, diagnosis, treatment, and preventive strategies to help you manage and avoid knee-related issues effectively. What is Causes of Knee Pain in Young Adults The term causes of knee pain in young adults refers to various underlying conditions, injuries, or lifestyle factors that lead to discomfort or pain in the knee joint among individuals typically aged 18–40. Unlike age-related degeneration, knee pain in this group is often associated with physical activity, muscle imbalance, or improper biomechanics. Knee pain can range from mild irritation to severe pain that affects daily activities such as walking, climbing stairs, or exercising. It may also be acute (sudden) or chronic (long-term). Causes of Knee Pain in Young Adults Understanding the causes of knee pain in young adults is critical for choosing the right treatment and prevention plan. Below are the most common factors: 1. Sports Injuries High-impact sports like football, basketball, and running often lead to injuries such as ligament tears (ACL, MCL), meniscus damage, or tendon strain. These are major reasons for knee pain in active individuals. 2. Overuse and Repetitive Stress Repeated stress on the knee joint due to excessive workouts or improper training can cause inflammation. Conditions like runner’s knee are common examples. 3. Poor Posture and Lifestyle Sedentary lifestyle, prolonged sitting, and incorrect posture increase pressure on the knees, leading to knee joint pain over time. 4. Muscle Imbalance Weak quadriceps or hamstrings can cause uneven stress distribution, resulting in knee discomfort and instability. 5. Obesity or Weight Gain Excess weight increases pressure on knees, causing faster joint wear, pain, and long-term damage, especially during walking, running, or climbing stairs. 6. Improper Footwear Unsupportive shoes disturb body alignment, putting uneven stress on knees and leading to pain, discomfort, and increased injury risk over time. 7. Hormonal Factors (Especially in Women) Hormonal changes can weaken ligaments, increasing joint laxity and making women more prone to knee pain and injuries during daily or physical activities. 8. Medical Conditions Issues like patellar tracking disorder or early arthritis affect joint function, causing pain, stiffness, and reduced mobility if not treated properly. Symptoms of Causes of Knee Pain in Young Adults The symptoms vary depending on the underlying cause but commonly include: Persistent or intermittent knee joint pain Swelling and inflammation Stiffness or reduced mobility Clicking or popping sound Pain while climbing stairs or bending Weakness or instability Ignoring these symptoms may worsen the condition and delay recovery. Risk Factors Several factors increase the likelihood of developing knee pain: Lack of physical activity Poor fitness level Improper exercise techniques Previous injuries Excess body weight Occupations requiring prolonged standing or sitting Gender (higher risk of knee pain in ladies) Identifying these risk factors early can help in prevention. Diagnosis and Medical Tests Accurate diagnosis is essential to identify the exact causes of knee pain in young adults and ensure effective treatment. Doctors may use physical exams, imaging tests like X-rays or MRI, and functional assessments to evaluate joint health, detect injuries, and plan the right treatment approach. Physical Examination Assessment of movement, swelling, and pain points. Imaging Tests X-ray: Detects bone-related issues MRI: Identifies ligament or cartilage damage Blood Tests Used to rule out infections or inflammatory conditions. Functional Tests Evaluate joint stability and mobility. Treatment Options Treatment depends on the severity and cause of the condition. Common knee pain solutions include: 1. Rest and Activity Modification Reducing physical strain helps in recovery. 2. Medications Pain relievers and anti-inflammatory drugs provide temporary knee pain relief. 3. Physiotherapy Targeted exercises improve strength and flexibility. 4. Knee Support Using the best knee cap for pain relief helps stabilize the joint and reduce pressure. 5. Cold and Heat Therapy Ice packs reduce swelling, while heat improves blood circulation. 6. Injections or Surgery In severe cases, medical procedures may be required. Recovery and Rehabilitation Recovery plays a key role in preventing recurrence. A structured rehabilitation plan includes: Gradual return to activity Strength training exercises Flexibility improvement Regular physiotherapy sessions Practicing knee pain relief exercises consistently ensures faster healing and better joint function. Prevention Tips Preventing knee pain is always better than treating it. Here are effective strategies: Maintain Healthy Weight Reducing body weight minimizes stress on the knee. Exercise Regularly Focus on strengthening leg muscles. Use Proper Footwear Choose shoes with good support and cushioning. Warm-Up Before Workouts Prepares muscles and reduces injury risk. Practice Good Posture Avoid long periods of sitting or standing. Avoid Overtraining Give your body adequate rest and recovery time. Following these steps can significantly reduce the risk of developing knee pain in the future. When to See a Doctor You should consult a medical professional if: Pain persists for more than a few days Swelling increases Difficulty in walking or bending Knee feels unstable or gives way Pain worsens despite home remedies Early diagnosis ensures effective treatment and prevents complications. FAQs What are the most common causes of knee pain in young adults? The most common causes of knee pain in young adults include sports injuries, overuse, poor posture, obesity, and muscle imbalance. Can knee pain in young adults be permanent? No, most cases are treatable with proper care, physiotherapy, and lifestyle changes. How can I get fast knee pain relief? Rest, ice therapy, medications, and knee pain relief exercises can help reduce pain quickly. Is knee pain more common in women? Yes, due to hormonal and anatomical differences, knee pain in ladies is relatively more common. What is the best knee pain solution at home? Maintaining proper posture, using support like the best
Hairline Fracture Recovery Time: Healing Process, Care & Precautions
Hairline Fracture Recovery Time: Healing Process, Care & Precautions A hairline fracture (also known as a stress fracture) is a small crack in the bone that often develops due to repetitive stress, overuse, or minor trauma. Unlike a complete fracture, a hairline fracture is not always immediately visible but can cause significant discomfort if left untreated. Understanding the hairline fracture recovery time, healing stages, and proper care is essential for faster recovery and preventing complications. This guide explains everything in simple language so patients can make informed decisions. What is a Hairline Fracture? A hairline fracture is a thin crack in the bone that usually occurs due to repeated pressure rather than a sudden injury. It is commonly seen in athletes, runners, and individuals involved in physical activities. From a medical perspective, hairline fractures fall under the category of stress injuries within bone fractures and are often linked to micro-damage in bone tissue. Common Types: Hairline fracture of the ankle Hairline fracture of the wrist Hairline fracture of the hand Hairline fracture of the foot Hairline Fracture Symptoms Recognizing hairline fracture symptoms early can help prevent worsening of the injury. Common Symptoms: Localized pain that increases with activity Swelling around the affected area Tenderness on touch Mild bruising Difficulty in movement Unlike major fractures, pain from a hairline fracture may reduce during rest but return during activity. Causes of Hairline Fracture Hairline fractures usually occur due to repetitive stress rather than a single traumatic event. Major Causes: Overuse (running, jumping, sports activities) Sudden increase in physical activity Weak bones (linked to Osteoporosis) Improper footwear Nutritional deficiencies (calcium, vitamin D) Hairline Fracture Recovery Time The hairline fracture recovery time varies depending on the location, severity, and overall health of the patient. Average Recovery Timeline: Mild cases: 4–6 weeks Moderate cases: 6–8 weeks Severe cases: 8–12 weeks For example: Hairline fracture ankle: 6–8 weeks Hairline fracture wrist: 4–6 weeks Hairline fracture hand: 3–6 weeks Recovery may take longer if the injury is ignored or if proper rest is not taken. Healing Process of Hairline Fracture Understanding the healing stages helps patients track their recovery. 1. Inflammatory Stage (0–7 days) Swelling and pain occur Blood clots form around the fracture 2. Reparative Stage (1–4 weeks) New bone tissue (callus) starts forming Pain gradually reduces 3. Remodeling Stage (4–12 weeks) Bone strengthens and returns to its normal shape This biological healing process is similar to how the body repairs a Stress Fracture. Hairline Fracture Treatment Proper hairline fracture treatment is crucial for faster recovery. Non-Surgical Treatment: Rest and activity restriction Ice therapy to reduce swelling Immobilization (brace, splint, or cast) Pain relief medications like Ibuprofen Advanced Treatment (if needed): Physiotherapy Bone stimulation therapy Rarely, surgery in complicated cases Hairline Fracture Ankle: Special Care A hairline fracture ankle is common among runners and athletes. Care Tips: Avoid weight-bearing activities Use ankle support or brace Elevate the foot to reduce swelling Ignoring ankle injuries can lead to complications affecting mobility. Hairline Fracture Wrist & Hand Hairline Fracture Wrist: Often caused by falls Requires immobilization with a splint Hairline Fracture Hand: Common in sports injuries Needs proper rest and limited movement These injuries can affect daily activities, so early treatment is important. Diet for Faster Recovery Nutrition plays a key role in reducing hairline fracture recovery time. Recommended Nutrients: Calcium-rich foods (milk, cheese) Vitamin D (sunlight exposure) Protein for tissue repair Magnesium and zinc A balanced diet supports bone healing and prevents future fractures. Do’s and Don’ts During Recovery Do’s: Take proper rest Follow the doctor’s advice Use support devices Maintain a healthy diet Don’ts: Avoid heavy exercise Do not ignore pain Avoid smoking and alcohol Complications of Untreated Hairline Fracture If not treated properly, a hairline fracture can lead to: Complete bone fracture Chronic pain Delayed healing Reduced mobility In some cases, it may worsen into severe orthopedic conditions requiring advanced care. When to See a Doctor? Consult a specialist if: Pain persists for more than a week Swelling increases Difficulty in movement No improvement with rest Early diagnosis using X-rays or MRI helps in faster treatment. Prevention Tips Preventing a hairline fracture is always better than treatment. Tips: Wear proper footwear Avoid sudden increase in activity Maintain bone strength Take adequate rest between workouts FAQs What is a hairline fracture? A hairline fracture is a small crack in the bone caused by repetitive stress or minor injury. What is the hairline fracture recovery time? The hairline fracture recovery time usually ranges from 4 to 8 weeks, depending on the severity and location. What are common hairline fracture symptoms? Common symptoms include pain, swelling, tenderness, and difficulty in movement. How is hairline fracture treatment done? Treatment includes rest, immobilization, pain relief medications, and sometimes physiotherapy. Can a hairline fracture heal without a cast? Yes, mild cases may heal with rest and support, but medical evaluation is always recommended. Conclusion A hairline fracture may seem minor, but it requires proper attention and care. Understanding the hairline fracture recovery time, symptoms, and treatment can help patients recover faster and avoid complications. With the right combination of rest, nutrition, and medical guidance, most hairline fractures heal completely within a few weeks. Always consult a qualified orthopedic specialist for accurate diagnosis and treatment.
Arthroscopic ACL Reconstruction: Procedure, Recovery Time & Success Rate Explained
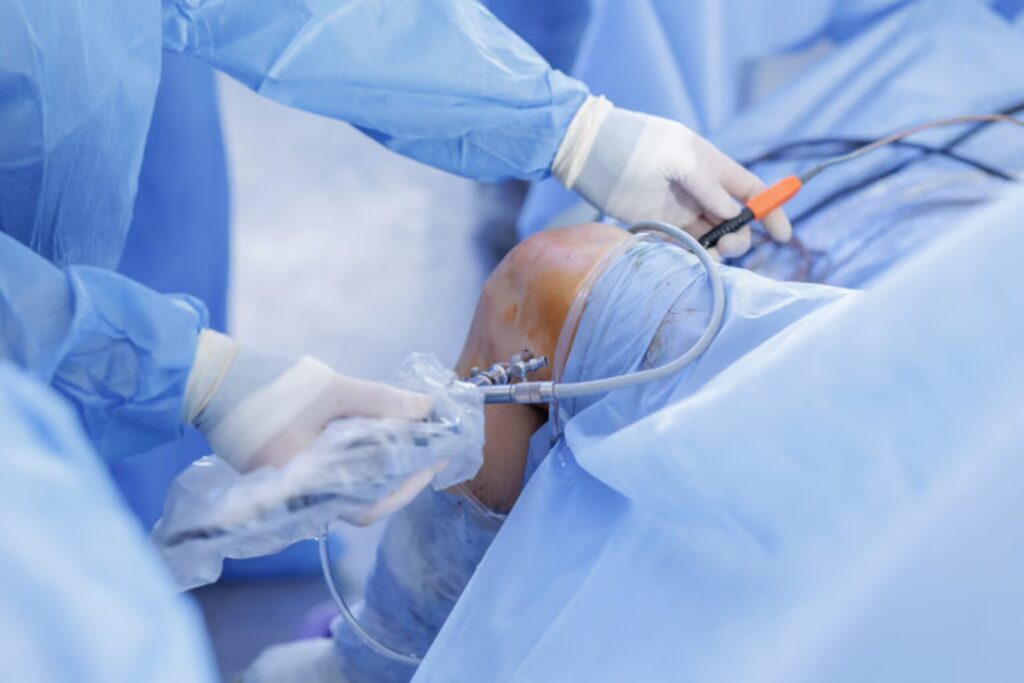
Arthroscopic ACL Reconstruction: Procedure, Recovery Time & Success Rate Explained Arthroscopic ACL reconstruction is one of the most advanced and commonly performed orthopedic procedures to treat a torn anterior cruciate ligament (ACL) in the knee. The ACL plays a critical role in stabilizing the knee joint, especially during activities like running, jumping, and sudden direction changes. Injuries to the ACL are very common among athletes and even in daily life due to accidents, falls, or sports trauma. When the ligament is completely torn or severely damaged, ACL reconstruction surgery is often recommended to restore knee stability and function. This blog will provide a complete, patient-friendly guide to Arthroscopic ACL reconstruction, including procedure details, recovery timeline, success rate, cost, and important precautions. What is Arthroscopic ACL Reconstruction? Arthroscopic ACL reconstruction is a minimally invasive surgical procedure used to replace a torn ACL with a graft (tissue taken from your own body or a donor). The surgery is performed using an arthroscope—a small camera inserted into the knee through tiny incisions. Unlike traditional open surgery, arthroscopy offers: Smaller cuts Less pain Faster recovery Better precision This procedure is widely considered the gold standard for ACL injury treatment. Causes of ACL Injury Understanding the cause of ACL injury helps in prevention and early treatment. Common causes include: Sudden twisting or pivoting movements Landing incorrectly after a jump Direct impact during sports (football, cricket, basketball) Road accidents or falls In some cases, people may experience a partial ACL tear, where the ligament is not completely torn but still causes instability. Symptoms of ACL Injury If you have an ACL injury, you may notice: A “popping” sound at the time of injury Severe knee pain Swelling within a few hours Difficulty in walking or bearing weight Knee instability or “giving way” sensation Early diagnosis is important for effective ACL injury treatment. When Do You Need Arthroscopic ACL Reconstruction? Not every ACL injury requires surgery. However, Arthroscopic ACL reconstruction is recommended in the following cases: Complete ACL tear Persistent knee instability Active individuals or athletes Failure of non-surgical treatment Associated injuries like meniscus tear For a partial ACL tear, doctors may initially suggest physiotherapy, but surgery may be needed if symptoms worsen. Arthroscopic ACL Reconstruction Procedure Step-by-Step Process of Arthroscopic ACL Reconstruction Here’s how Arthroscopic ACL reconstruction is performed: 1. Pre-Surgery Preparation Physical examination and MRI scan Blood tests and medical evaluation Prehabilitation exercises to strengthen muscles 2. Anesthesia The patient is given spinal or general anesthesia 3. Arthroscopy Small incisions are made around the knee An arthroscope (camera) is inserted to visualize the joint 4. Removal of Damaged Ligament The torn ACL is removed carefully 5. Graft Selection Common graft options include: Hamstring tendon Patellar tendon Donor graft (allograft) 6. Graft Placement The new ligament is fixed using screws or implants 7. Closure Incisions are closed with stitches The entire ACL reconstruction surgery usually takes around 1 to 2 hours. Benefits of Arthroscopic ACL Reconstruction Choosing Arthroscopic ACL reconstruction offers several advantages: Minimally invasive technique Faster recovery compared to open surgery Less post-operative pain Smaller scars High success rate Early return to sports and activities Arthroscopic ACL Reconstruction Recovery Time Recovery after Arthroscopic ACL reconstruction depends on several factors like age, fitness level, and adherence to rehabilitation. Recovery Timeline Week 1–2 Pain and swelling reduce Walking with support Basic exercises start Week 3–6 Improved knee movement Strengthening exercises Reduced dependency on crutches 2–3 Months Increased strength and flexibility Light physical activities 4–6 Months Advanced physiotherapy Jogging and sports drills 6–9 Months Return to sports (depending on recovery) Proper rehabilitation is crucial for the success of ACL reconstruction surgery. Physiotherapy After Arthroscopic ACL Reconstruction Physiotherapy plays a key role in recovery: Improves range of motion Strengthens muscles Prevents stiffness Reduces risk of re-injury Skipping rehab can lead to complications and poor outcomes. Success Rate of Arthroscopic ACL Reconstruction The success rate of Arthroscopic ACL reconstruction is very high, typically around 85% to 95%. Factors affecting success include: Surgeon’s expertise Patient’s age and fitness Proper rehabilitation Type of graft used Most patients return to normal activities and sports after successful ACL reconstruction surgery. ACL Surgery Cost in India The ACL surgery cost in India varies based on hospital, surgeon, and city. Average Cost Range: ₹80,000 to ₹2,50,000 Factors Affecting Cost: Type of hospital (private/government) Surgeon’s experience Type of graft used Implant quality Post-surgery rehabilitation The ACL reconstruction surgery cost may also include diagnostic tests, hospital stay, and physiotherapy sessions. Risks and Complications Although Arthroscopic ACL reconstruction is safe, some risks may include: Infection Blood clots Knee stiffness Graft failure Persistent pain Bad Signs After ACL Surgery Watch out for these bad signs after ACL surgery: Severe swelling that doesn’t reduce Continuous pain Fever or infection signs Limited knee movement Instability even after surgery If you notice these symptoms, consult your doctor immediately. Tips for Faster Recovery To ensure a smooth recovery after Arthroscopic ACL reconstruction, follow these tips: Follow your physiotherapy routine strictly Avoid high-impact activities early Maintain a healthy diet Keep your weight under control Use knee braces if recommended Prevention of ACL Injuries Preventing ACL injuries is always better than treatment. You can reduce risk by: Strength training exercises Proper warm-up before sports Using correct techniques during activities Wearing proper footwear FAQs What is Arthroscopic ACL reconstruction? Arthroscopic ACL reconstruction is a minimally invasive surgery to replace a torn ACL using a graft and a camera-guided technique. How long does it take to recover from ACL reconstruction surgery? Recovery from ACL reconstruction surgery usually takes 6 to 9 months, depending on rehabilitation and patient condition. What is the success rate of Arthroscopic ACL reconstruction? The success rate of Arthroscopic ACL reconstruction is around 85% to 95%. What is the ACL surgery cost in India? The ACL surgery cost in India ranges between ₹80,000 to ₹2,50,000, depending on multiple factors. When can I return to sports after ACL reconstruction? Most patients can return to sports 6–9 months after Arthroscopic ACL reconstruction, based on recovery progress.
How to Identify Dislocated Shoulder Symptoms: Warning Signs & Treatment Options

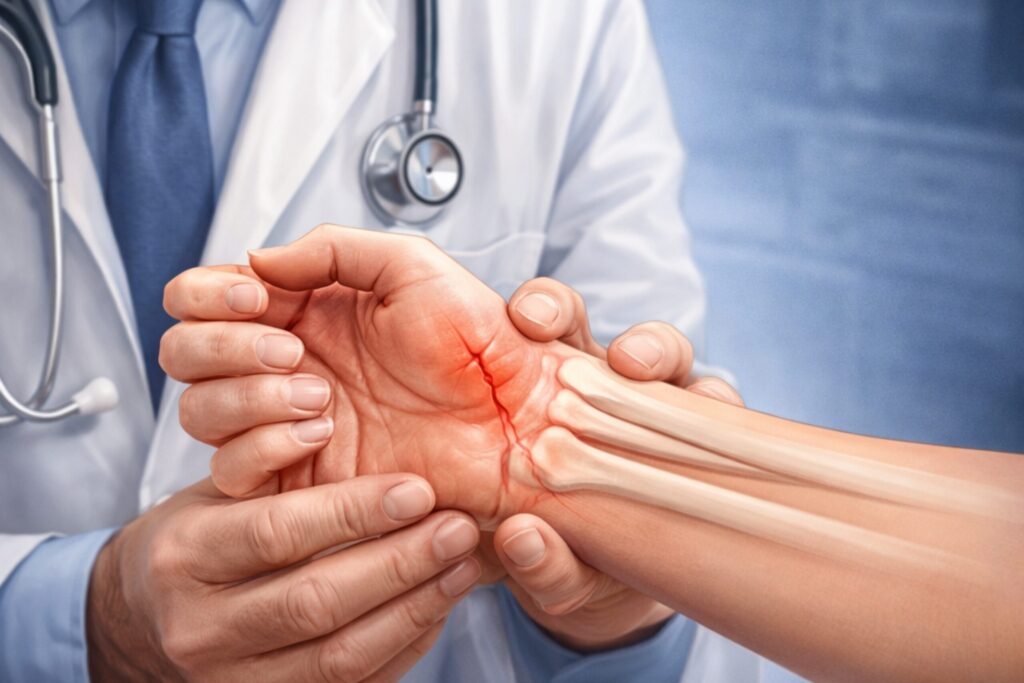
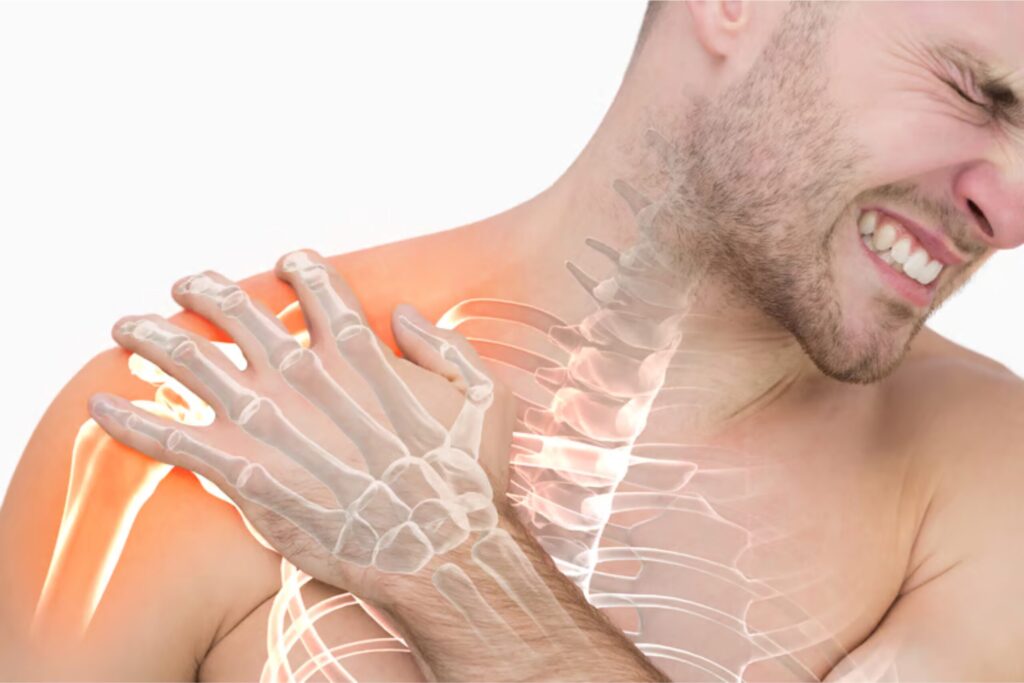
How to Identify Dislocated Shoulder Symptoms: Warning Signs & Treatment Options Understanding dislocated shoulder symptoms is crucial for early diagnosis and effective treatment. A shoulder dislocation is a painful condition that occurs when the upper arm bone (humerus) pops out of the shoulder socket. Since the shoulder joint is the most mobile joint in the body, it is also highly prone to instability and injury. Recognizing dislocated shoulder symptoms early can help prevent complications such as nerve damage, chronic instability, and repeated dislocations. Whether caused by sports injuries, falls, or accidents, timely care is essential for proper healing. What Is a Dislocated Shoulder? A dislocated shoulder occurs when the ball of the shoulder joint moves out of its socket. This condition is also known as shoulder joint dislocation and can be partial (subluxation) or complete. Types of Shoulder Dislocation: Anterior Dislocation (most common): The bone moves forward Posterior Dislocation: The bone moves backward Inferior Dislocation: Rare, downward displacement A shoulder joint dislocation can damage surrounding ligaments, muscles, and tissues, making it important to identify dislocated shoulder symptoms quickly. Common Dislocated Shoulder Symptoms Recognizing dislocated shoulder symptoms early helps you take quick action, reduce pain, and prevent serious complications like nerve damage, repeated dislocation, and long-term shoulder instability. 1 Severe Shoulder Pain One of the first dislocated shoulder symptoms is intense pain, especially when trying to move the arm. 2 Visible Deformity The shoulder may appear out of place or have an unusual shape compared to the normal side. 3 Swelling and Bruising Inflammation and discoloration develop quickly after a dislocated shoulder. 4 Limited Range of Motion You may find it difficult or impossible to move your arm due to pain and joint instability. 5 Numbness or Tingling Nerve involvement can cause tingling sensations in the arm or hand. 6 Muscle Spasms Involuntary muscle tightening is another common indicator of a dislocated shoulder. Warning Signs You Should Not Ignore Some dislocated shoulder symptoms require immediate medical attention, such as severe pain, visible deformity, swelling, numbness, or inability to move the arm. Ignoring these warning signs can lead to complications like nerve damage, repeated dislocation, and long-term shoulder instability. Red Flags: Inability to move the arm Severe, persistent pain Visible dislocation Loss of sensation Weak pulse in the arm Ignoring these signs can worsen the condition and complicate shoulder dislocation treatment. Causes of Dislocated Shoulder A dislocated shoulder can occur due to sports injuries, falls, accidents, or sudden impact. Weak ligaments and previous injuries can also increase the risk of shoulder joint dislocation and recurring instability. Sports Injuries Contact sports like cricket, football, and wrestling often lead to shoulder joint dislocation. Falls and Accidents Landing on an outstretched arm is a common cause. Sudden Impact Road accidents or heavy blows can force the shoulder out of place. Weak Ligaments Loose or previously injured ligaments increase the risk of repeated dislocations. Diagnosis of Dislocated Shoulder Symptoms Proper diagnosis is essential for effective shoulder dislocation treatment. Accurate assessment using physical exams and imaging helps identify damage, guide reduction, and ensure faster recovery while preventing complications. Physical Examination Doctors evaluate visible deformity, swelling, and movement limitations. Imaging Tests X-rays: Confirm the dislocation MRI: Detect soft tissue damage CT scan: Assess complex injuries Diagnosis helps determine whether immediate shoulder dislocation reduction is needed. Treatment Options for Dislocated Shoulder Treatment depends on the severity of dislocated shoulder symptoms, ranging from rest and immobilization to medical reduction and physiotherapy. In severe cases, surgery may be required to restore stability, reduce pain, and prevent repeated shoulder dislocation in the future. Immediate First Aid Immobilize the arm Apply ice to reduce swelling Avoid moving the shoulder Never attempt self-shoulder dislocation reduction, as it may cause further damage. Shoulder Dislocation Reduction Shoulder dislocation reduction is a medical procedure where the bone is placed back into the socket by a trained professional. This is usually done under sedation to reduce pain. Non-Surgical Treatment After reduction, conservative care includes: Sling immobilization Pain relief medications Physiotherapy This approach is effective for many first-time dislocations. Shoulder Dislocation Exercise Rehabilitation plays a key role in recovery. Proper shoulder dislocation exercise helps restore strength and mobility. Examples: Pendulum swings Wall climbing exercises Resistance band strengthening These exercises are essential for preventing future shoulder joint dislocation. Surgical Treatment Surgery may be required if: There are repeated dislocations Ligaments are severely damaged Conservative treatment fails Surgical procedures aim to stabilize the dislocated shoulder and prevent recurrence. Recovery Timeline Recovery varies depending on severity. Typical Recovery Phases: 0–2 weeks: Pain control and immobilization 3–6 weeks: Gradual movement 6–12 weeks: Strengthening with shoulder dislocation exercise 3–6 months: Full recovery Following rehabilitation guidelines ensures proper healing of the dislocated shoulder. Complications of Untreated Dislocated Shoulder Recovery from a dislocated shoulder varies by severity, but most cases improve with rest, physiotherapy, and gradual exercises. Proper care helps restore strength, mobility, and reduces the risk of future dislocations. Chronic shoulder instability Repeated dislocations Nerve or blood vessel damage Reduced shoulder strength Timely shoulder dislocation treatment can prevent long-term issues. Prevention Tips Preventing dislocated shoulder symptoms is possible with proper care. Tips: Strengthen shoulder muscles Avoid risky movements Use protective gear during sports Perform regular shoulder dislocation exercise Maintain proper posture Prevention reduces the chances of future shoulder joint dislocation. When to See a Doctor Seek immediate medical help if: You suspect a dislocated shoulder Pain is severe Arm movement is restricted There is numbness or swelling Early intervention improves recovery outcomes. FAQs What are the first dislocated shoulder symptoms? Severe pain, swelling, and inability to move the arm are the earliest signs. Can a dislocated shoulder heal without treatment? No, proper shoulder dislocation treatment is necessary to reposition the joint and avoid complications. How painful is a shoulder dislocation? It is extremely painful and often requires immediate medical attention. What is shoulder dislocation reduction? It is a procedure to put the bone back into its socket safely. How long does recovery take? Recovery usually takes 6 weeks to 3
What Is the Rotator Cuff Interval? Causes of Injury, Symptoms & Treatment Options
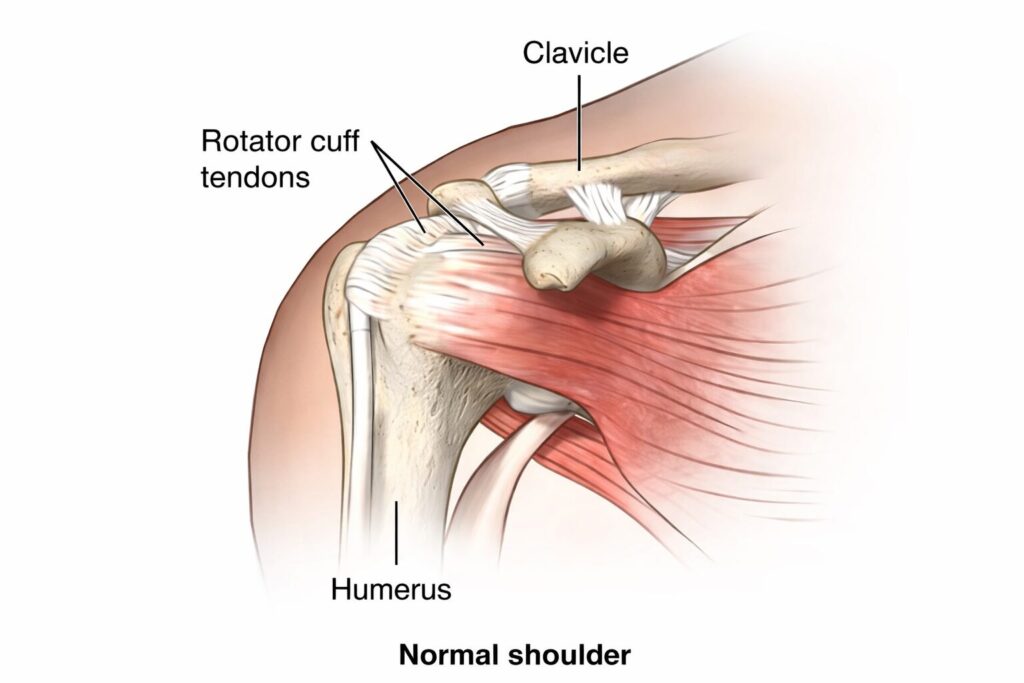
What Is the Rotator Cuff Interval? Causes of Injury, Symptoms & Treatment Options The rotator cuff interval is a small but highly significant anatomical space in the shoulder joint that plays a crucial role in stability and movement. Although often overlooked, this region is essential for maintaining proper shoulder mechanics and preventing instability. Located between two important rotator cuff muscles, the supraspinatus and subscapularis, the rotator cuff interval contains key structures such as ligaments and the long head of the biceps tendon. Any damage or abnormality in this area can lead to shoulder pain, weakness, and restricted movement. Understanding the rotator cuff interval is especially important for patients dealing with chronic shoulder pain or athletes who frequently perform overhead movements. What Is the Rotator Cuff Interval? The rotator cuff interval is a triangular anatomical space in the shoulder. It is bordered by: Supraspinatus tendon (upper side) Subscapularis tendon (lower side) Base formed by the coracoid process This region contains important structures such as: Coracohumeral ligament Superior glenohumeral ligament Long head of the biceps tendon The rotator cuff interval plays a key role in: Stabilizing the shoulder joint Limiting excessive external rotation Preventing upward displacement of the humeral head Any dysfunction in the rotator cuff interval can contribute to shoulder instability and pain, often mimicking a rotator cuff injury. Anatomy and Function of Rotator Cuff Interval The rotator cuff interval acts as a stabilizing bridge between different components of the rotator cuff. While the rotator cuff muscles are responsible for movement and dynamic stability, the interval provides static stability. Key Functions: Maintains joint integrity Supports the biceps tendon Controls shoulder motion Prevents excessive translation of the humeral head Damage to this area can disrupt coordination among the rotator cuff muscles, leading to reduced shoulder efficiency and pain during daily activities. Causes of Rotator Cuff Interval Injury Injury to the rotator cuff interval can occur due to various reasons. These causes are often linked to repetitive stress, trauma, or degeneration. 1 Repetitive Overhead Activities Athletes such as cricketers, swimmers, and tennis players frequently stress the shoulder joint. Over time, this can lead to strain in the rotator cuff interval and surrounding rotator cuff muscles. 2 Trauma or Sudden Injury A fall on the shoulder or lifting a heavy weight incorrectly can damage the rotator cuff interval, sometimes along with a rotator cuff tear. 3 Shoulder Instability Loose ligaments or repeated dislocations can weaken the rotator cuff interval, affecting joint stability. 4 Degenerative Changes Age-related wear and tear can affect the rotator cuff, increasing the risk of interval injuries. 5 Poor Posture Incorrect posture puts uneven stress on the shoulder, contributing to a rotator cuff injury involving the interval. Symptoms of Rotator Cuff Interval Injury Recognizing the symptoms early can help prevent worsening of the condition. A damaged rotator cuff interval often presents symptoms similar to other shoulder problems. Common Symptoms: Persistent shoulder pain Weakness in the arm Limited range of motion Pain during overhead activities Clicking or popping sensation Difficulty lifting objects In severe cases, symptoms may resemble a rotator cuff tear, making proper diagnosis essential. Diagnosis of Rotator Cuff Interval Problems Accurate diagnosis of the rotator cuff interval condition is critical for effective treatment. Physical Examination Doctors assess shoulder movement, strength, and stability to identify signs of rotator cuff injury. Imaging Tests MRI Scan: Best method to visualize soft tissues Ultrasound: Helps detect tears and inflammation X-rays: Rule out bone abnormalities MRI is particularly useful in identifying abnormalities in the rotator cuff interval and differentiating them from a rotator cuff tear. Treatment Options for Rotator Cuff Interval Injury Treatment for rotator cuff interval injuries depends on severity, age, and activity level of the patient. Non-Surgical Treatment Most cases can be managed without surgery. Rest and Activity Modification Avoid activities that strain the rotator cuff interval and allow healing. Medications Anti-inflammatory drugs help reduce pain and swelling. Physiotherapy Targeted rehab strengthens the rotator cuff muscles and improves mobility Rotator Cuff Exercises Proper rehabilitation includes rotator cuff exercises that restore strength and flexibility. Examples: Pendulum exercises External rotation exercises Shoulder blade squeezes These rotator cuff strengthening exercises help stabilize the shoulder and protect the rotator cuff interval. Advanced Non-Surgical Treatments Steroid injections for inflammation PRP therapy for healing These methods are useful in managing chronic rotator cuff injury cases. Surgical Treatment Surgery is recommended when conservative treatment fails or when there is a severe rotator cuff tear involving the interval. Types of Surgery: Arthroscopic repair Interval closure procedures Ligament reconstruction Surgery aims to restore stability and function of the rotator cuff interval. Recovery After Rotator Cuff Interval Treatment Recovery depends on the type of treatment. Non-Surgical Recovery: 4–8 weeks for mild injuries Gradual return to activities Post-Surgery Recovery: 3–6 months for full recovery Physiotherapy is essential Following prescribed rotator cuff strengthening exercises is crucial for long-term success. Who Is at Risk of Rotator Cuff Interval Injury? Certain individuals are more prone to rotator cuff interval issues: Athletes involved in overhead sports People with previous shoulder injuries Older adults with degenerative changes Individuals with poor posture or weak rotator cuff muscles Understanding risk factors helps in early prevention. Prevention Tips for Rotator Cuff Interval Injury Preventing injury to the rotator cuff interval is possible with simple lifestyle changes. Effective Tips: Perform regular rotator cuff exercises Maintain proper posture Avoid overuse of shoulder Warm up before physical activity Strengthen shoulder muscles with rotator cuff strengthening exercises Consistency in these habits reduces the risk of rotator cuff injury. Rotator Cuff Interval vs Rotator Cuff Tear Many people confuse rotator cuff interval problems with a rotator cuff tear. Key Differences: Feature Rotator Cuff Interval Issue Rotator Cuff Tear Location Between tendons Tendon damage Cause Instability, ligament issues Tendon rupture Treatment Rehab, sometimes surgery Often surgical Both conditions may occur together in severe cases. When to See a Doctor You should consult a specialist if: Pain persists for more than 2 weeks Shoulder weakness increases Movement becomes restricted Symptoms worsen despite rest Early treatment
Shoulder Joint Ligaments Explained: Structure, Function, and Common Injuries
Shoulder Joint Ligaments Explained: Structure, Function, and Common Injuries The shoulder is one of the most flexible joints in the human body, allowing a wide range of movements such as lifting, rotating, and reaching. However, this high mobility also makes the shoulder more vulnerable to injuries. One of the most important components that provide stability to the shoulder joint is the shoulder joint ligaments. These ligaments connect bones and help maintain proper joint alignment. Understanding shoulder joint ligaments is important because damage to these structures can lead to pain, instability, and restricted movement. Many people experience shoulder injuries during sports, accidents, or repetitive physical activities. In such cases, problems like shoulder ligament strain, shoulder ligament tear, or torn shoulder ligament can occur. In this detailed guide, we will explain the structure, function, and common injuries related to shoulder joint ligaments, along with symptoms, causes, and treatment options. Understanding Shoulder Joint Ligaments The shoulder joint ligaments are strong bands of connective tissue that connect bones within the shoulder joint. These ligaments help hold the shoulder together and prevent excessive movement that may cause injury. The shoulder joint mainly consists of the humerus (upper arm bone), scapula (shoulder blade), and clavicle (collarbone). The shoulder joint ligaments provide stability to this complex structure and allow smooth joint movement while protecting the joint from dislocation or damage. When these ligaments are overstretched or torn, it may lead to shoulder ligament damage and severe discomfort. Structure of Shoulder Joint Ligaments The shoulder joint ligaments include several important ligament structures that stabilize the shoulder joint. 1. Glenohumeral Ligaments These ligaments are the primary stabilizers of the shoulder joint. They connect the humerus to the glenoid cavity of the scapula and help prevent excessive movement. Injuries to these ligaments may result in shoulder ligament injury and instability in the shoulder joint. 2. Coracohumeral Ligament This ligament supports the upper part of the shoulder joint and helps prevent downward displacement of the humerus. Damage to this ligament can cause shoulder ligament pain and difficulty lifting the arm. 3. Coracoacromial Ligament This ligament forms a protective arch over the shoulder joint. It prevents the humeral head from moving upward excessively. When injured, it may lead to shoulder ligament strain and inflammation. 4. Acromioclavicular Ligament This ligament connects the clavicle to the acromion of the scapula. It stabilizes the acromioclavicular joint and supports shoulder movement. An injury to this ligament may cause shoulder injuries such as AC joint separation. Function of Shoulder Joint Ligaments The shoulder joint ligaments play several important roles in maintaining shoulder stability and mobility. Joint Stability One of the primary functions of shoulder joint ligaments is to stabilize the shoulder joint. They prevent excessive or abnormal movement that could lead to injury. Supporting Movement The shoulder allows complex movements such as rotation, lifting, and extension. Shoulder joint ligaments help control these movements and keep the bones aligned. Injury Prevention Strong shoulder joint ligaments protect the shoulder joint from dislocation and other shoulder injuries during physical activity. Common Shoulder Ligament Injuries Damage to the shoulder joint ligaments can occur due to sports activities, trauma, or repetitive strain. Some of the most common ligament injuries include the following: Shoulder Ligament Strain A shoulder ligament strain occurs when the ligament is overstretched but not completely torn. This condition often develops during heavy lifting or sudden shoulder movement. Shoulder Ligament Tear A shoulder ligament tear occurs when the ligament fibers partially or completely rupture. This injury may cause severe pain, swelling, and restricted movement. In severe cases, a torn shoulder ligament may require medical treatment or surgery. Shoulder Ligament Damage Repeated stress on the shoulder can cause gradual shoulder ligament damage. Athletes who play sports such as cricket, tennis, or swimming are more likely to experience this problem. Shoulder Dislocation Shoulder dislocation can also damage shoulder joint ligaments, leading to instability and recurrent shoulder injuries. Shoulder Injury Symptoms Recognizing shoulder injury symptoms early can help prevent serious complications. Some common symptoms include: Persistent shoulder ligament pain Swelling around the shoulder joint Difficulty lifting or rotating the arm Shoulder instability Limited range of motion Clicking or popping sounds in the shoulder If these shoulder injury symptoms continue for several days, it is important to consult a medical professional for proper diagnosis. Causes of Shoulder Ligament Injuries Several factors can contribute to injuries involving shoulder joint ligaments. Sports Activities Athletes involved in throwing sports such as baseball or cricket often experience shoulder ligament injury due to repetitive overhead movements. Trauma or Accidents Falls, accidents, or direct impact on the shoulder can cause shoulder ligament tear or other serious shoulder injuries. Overuse Repetitive stress from activities like weightlifting can lead to shoulder ligament strain. Weak Muscles Weak shoulder muscles increase the risk of shoulder ligament damage because the ligaments have to compensate for reduced muscle support. Shoulder Ligament Tear Treatment The treatment for ligament injuries depends on the severity of the damage. Proper shoulder ligament tear treatment may include several approaches. Rest and Activity Modification Resting the shoulder allows the injured ligament to heal naturally. Avoiding activities that cause pain is important during recovery. Ice Therapy Applying ice to the shoulder can reduce swelling and relieve shoulder ligament pain. Physiotherapy Physiotherapy exercises help strengthen the shoulder muscles and improve joint stability after shoulder ligament injury. Medications Doctors may prescribe anti-inflammatory medications to manage pain and swelling. Surgery In severe cases involving a torn shoulder ligament, surgery may be required to repair the damaged ligament. Early shoulder ligament tear treatment helps restore shoulder function and prevent long-term complications. Preventing Shoulder Ligament Injuries Preventing damage to shoulder joint ligaments is possible by following a few simple precautions. Perform a proper warm-up before sports activities Strengthen shoulder muscles through regular exercise Avoid sudden heavy lifting Maintain correct posture during workouts Follow proper training techniques These measures can reduce the risk of shoulder injuries and protect the ligaments from strain or damage. When to See a Doctor You should seek medical attention if you experience: Severe
Slip Disc Problem: Causes, Symptoms, Diagnosis & Treatment Options
Slip Disc Problem: Causes, Symptoms, Diagnosis & Treatment Options Back pain is one of the most common health issues affecting people today. Among the various spinal conditions that lead to persistent discomfort, the slip disc problem is one of the most frequently diagnosed conditions. It occurs when the soft inner portion of a spinal disc pushes through its outer layer and irritates nearby nerves. The human spine is made up of vertebrae separated by discs that act as shock absorbers. These discs allow smooth movement of the spine while protecting it from pressure and sudden impact. However, when discs become damaged due to injury or poor posture, a spinal disc injury may occur, sometimes requiring Dislocation & Subluxation Management for proper treatment. This guide explains the causes, symptoms, diagnosis, and treatment options for the slip disc problem, along with helpful exercises and preventive strategies. What Is a Slip Disc Problem? Understanding Spinal Disc Anatomy The slip disc problem, medically referred to as a herniated or prolapsed disc, occurs when the soft gel-like material inside a spinal disc pushes outward through a tear in its outer layer. Each spinal disc has two main components: Annulus fibrosus – the tough outer ring that holds the disc together Nucleus pulposus – the soft inner gel that absorbs pressure When the outer layer weakens or tears, the inner gel can bulge outward and press on nearby nerves, causing pain and other neurological symptoms. Common Areas Affected A spinal disc injury can occur in different parts of the spine, but it most commonly affects: Lumbar spine (lower back) Cervical spine (neck region) Thoracic spine (upper back, less common) The lower back is particularly vulnerable because it carries most of the body’s weight and experiences significant movement and stress during daily activities. Understanding the nature of a slip disc problem helps patients recognize the importance of early diagnosis and treatment. Causes of Slip Disc Problem Age-Related Degeneration Injuries such as ACL or MCL tears can cause instability and pain in the knee joint. 2. Arthritis One of the most common causes of a slip disc problem is natural wear and tear of the spinal discs. As people age, discs gradually lose their flexibility and water content, making them more prone to damage. Improper Lifting Techniques Incorrect lifting techniques place excessive pressure on the spine. Common mistakes include: lifting heavy objects without bending the knees twisting the back while lifting sudden jerking movements These actions increase the risk of a spinal disc injury. Poor Posture Sitting for long hours with improper posture can weaken spinal muscles and increase pressure on spinal discs. Common posture-related risks include: slouching while sitting working long hours on a computer lack of ergonomic support Sports Injuries and Trauma Athletes involved in high-impact sports may develop a slip disc problem due to sudden twisting movements or accidents. Obesity and Lifestyle Factors Excess body weight increases stress on the spine and contributes to disc degeneration. Risk factors include: sedentary lifestyle lack of regular exercise weak core muscles Identifying these causes can help individuals adopt preventive measures and reduce the risk of future spinal disc injury. Slipped Disc Symptoms Common Symptoms of a Slip Disc The symptoms of a slip disc problem depend on the location of the injured disc and the nerves affected. Common slipped disc symptoms include: persistent lower back pain pain radiating to the legs or arms numbness or tingling sensations muscle weakness stiffness in the back Sciatica and Nerve Pain When a disc presses on the sciatic nerve, patients may experience sciatica, which causes: sharp pain from the lower back to the leg burning sensation in the leg difficulty standing or walking Severe Symptoms That Need Immediate Attention In rare cases, severe nerve compression may cause: loss of bladder or bowel control severe muscle weakness inability to move normally These symptoms require immediate medical evaluation and prompt slip disc treatment. Diagnosis of Slip Disc Problem Physical Examination Doctors begin diagnosing a slip disc problem by conducting a detailed physical examination. During the examination, doctors check: spinal alignment muscle strength reflex responses nerve sensitivity These tests help identify signs of a spinal disc injury. Imaging Tests Imaging tests are essential to confirm the diagnosis and determine the severity of the condition. Common diagnostic tools include: MRI Scan MRI is the most reliable test for detecting disc damage and nerve compression. X-Ray X-rays help identify bone abnormalities or spinal alignment issues. CT Scan CT scans provide detailed images of the spine for complex cases. Accurate diagnosis helps doctors determine the most effective slip disc problem solution for each patient. Slip Disc Treatment Options Non-Surgical Treatments Most patients recover from a slip disc problem without surgery. Common slip disc treatment methods include: pain-relief medications anti-inflammatory drugs physiotherapy and rehabilitation Physiotherapy strengthens spinal muscles and improves flexibility, reducing pressure on the injured disc. Supportive Devices Doctors may recommend supportive devices such as a slip disc belt to stabilize the lower back and reduce strain during movement. Benefits of using a slip disc belt include: improved posture support reduced spinal pressure temporary pain relief during daily activities Surgical Treatment Surgery is considered when: severe nerve compression occurs conservative treatment fails mobility is severely affected Modern minimally invasive procedures allow doctors to treat a spinal disc injury with faster recovery and minimal complications. Slipped Disc Exercises and Prevention Exercises for Recovery Regular slipped disc exercises can strengthen the spine and help relieve pain. Common recommended exercises include: pelvic tilt exercises knee-to-chest stretches gentle back extensions core strengthening exercises Hamstring flexibility plays an important role in spinal health. Tight hamstrings can increase pressure on the lower back and worsen a slip disc problem. Learning proper hamstring injury prevention exercises can help reduce spinal strain and support recovery. Lifestyle Changes for Prevention Preventing a slip disc problem requires maintaining a healthy lifestyle. Important preventive measures include: maintaining correct posture avoiding heavy lifting staying physically active strengthening core muscles Many patients ask How to solve slip


